SQL Extensions   «Prev  Next»

Lesson 6Setting Column Attributes
Objective Modify Column Headings and display Width

Setting Oracle Column Attributes

SQL*Plus can be used to generate reports from your queries. There are a variety of environment commands that adjust the appearance of your output. The following table describes some of these environment commands.

SQL*Plus Environment command Description
COL[UMN] columnname [expression] Specify attributes for the column. Expression can be one or more of these choices:
  1. FORMAT [An | 999] - set the width of column
  2. HEADING text - text in column heading
  3. JUSTIFY [LEFT | RIGHT | CENTER] NOPRINT NEWLINE - go to new line before printing column
SET attribute Adjust environment settings. Attributes listed below are the more popular ones. The first option is the default setting. There are many more attributes.
>ECHO [OFF|ON] Repeat a command in a file before executing it.
FEED[BACK] [6|n|OFF|ON] Report how many rows you want returned.
HEA[DING] [OFF|ON] Turn on and off all column headings.
LIN[ESIZE] [80|n] Adjust number of characters per line.
PAGES[IZE] [24|n] Adjust number of lines per page.
TERM[OUT] [OFF|ON] Turn on and off output display.
TIMI[NG] [OFF|ON] Turn on and off performance display.
VER[IFY] [OFF|ON] Turn on and off variable substitution display.
SHOW [ALL | attribute ] Show the setting(s) for all attributes or for the specified attribute.

Review the followingseries of images to see how easy it is to change a query into a report good enough to print.
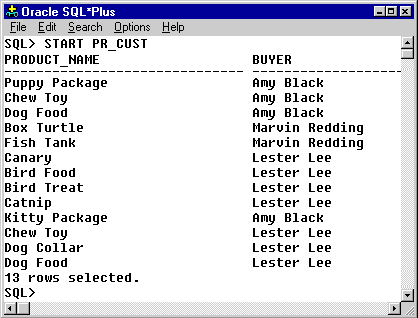
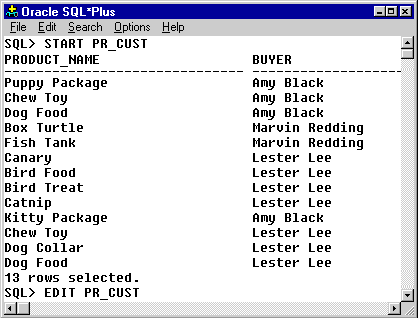
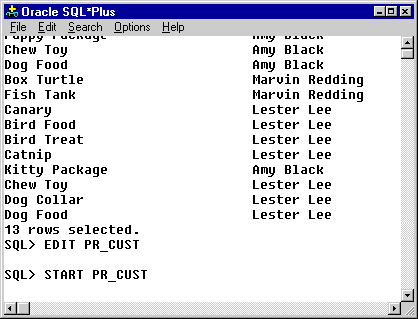
1) In the previous lesson, we saved a file with a query. This show the results when you execute the query. The BUYER column is so wide that we do not even see the third column in our window. The first column has an ugly heading, as does the third column.

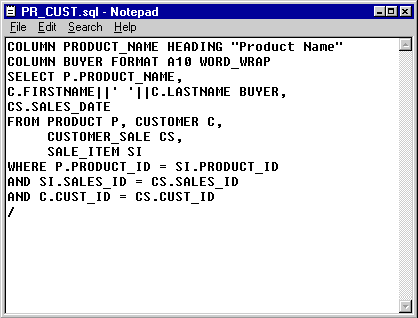
2) To modify the column attributes, edit the file using text editor
2) To modify the column attributes, edit the file using the text editor

3) The first change is to modify the column heading for the PRODUCT_NAME column. The first line in the file is inserted as seen here. Double quotes around the heading text allows us to use spaces and lower case letters. Notice that the COLUMN command is added before the query. Environment settings must be put in place prior to executing the query. However, once they are changed, the change remains in effect until you leave SQL*Plus.

4) The second change to adjust the width of the BUYER column. Notice that we use the column alias name as it is shown in the query. The WORD_WRAP parameter is also added so that if the name is longer than 10 characters, it will wrap to a second line, breaking between words.

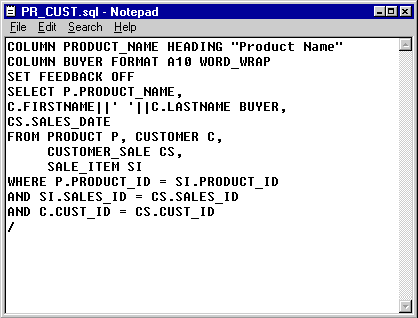
5) The final change is to tell SQL*Plus to omit the line at the end of the query stating how many rows were returned. Do this with the SET FEEDBACK OFF command. After completing these changes, exit the text editor by clicking the X in the top right corner.

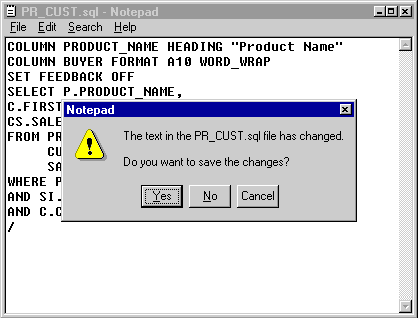
6) Notepad prompts you to save the changes . Clicking on the Yes button saves the changes to the PR_CUST.sql file
6) Notepad prompts you to save the changes . Clicking on the Yes button saves the changes to the PR_CUST.sql file.

7) Now that you have returned to SQL*PLUS, execute the SQL*Plus environment commands and the query using the START command.

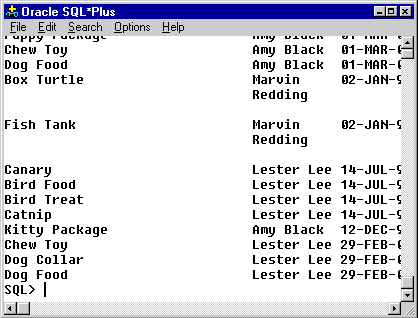
8) The results of the query look different now. The column heading has changed, the width of the BUYER is shorter, and you can see part (but not all) of the SALES_DATE column data. There is no record count at the end. All these settings stay in place until we exit SQL*Plus or modify the setting again during our session.

Editing Scripts in SQL*Plus Command-Line

You can use a number of SQL*Plus commands to edit the SQL command or PL/SQL block currently stored in the buffer.
The SQL*Plus CHANGE command enables you to edit the current line. Various actions determine which line is the current line:
  1. LIST a given line to make it the current line.
  2. When you LIST or RUN the command in the buffer, the last line of the command becomes the current line. (Note, that using the slash (/) command to run the command in the buffer does not affect the current line.)
  3. If you get an error, the error line automatically becomes the current line.

Using SQL*Plus commands to adjust Column and Page Settings

The next lesson continues with more SQL*Plus environment commands that help create reports. SQL*Plus environment commands to Adjust Column Page Settings.
Your solution should have followed these steps:
  1. You executed the query for your report by typing / at the SQL> prompt and pressing Enter.
  2. You created a file with this query in it so that you could add some SQL*Plus commands to it. You wrote the query to a file named CUST_BUY.sql by typing SAVE CUST_BUY at the SQL> prompt and pressing Enter.
  3. You made some changes to the file you created by starting up a text editor. You typed EDIT CUST_BUY at the SQL> prompt and pressed Enter.
  4. In the first line of the file, you typed COLUMN SALES_DATE HEADING "SALES DT" to change the heading of the first column in the Select clause to SALES DT. You then pressed Enter.
  5. You changed the column width to 15 characters and changed the column heading to NAME by typing COLUMN LASTNAME FORMAT A15 HEADING "NAME" in the next line. You then pressed Enter.
  6. You changed the column width to two numeric characters and changed the column heading to # ITEMS by typing COLUMN PROD_COUNT FORMAT 99 HEADING "# ITEMS" in the next line. You then pressed Enter.
  7. You typed COLUMN TOTAL_SALE FORMAT 9999.99 HEADING "PMT" at the first blank line in the file to change the column width to four numbers to the left and two numbers to the right of the decimal point, and to change the column heading to PMT. You then pressed Enter.
  8. You changed the number of lines per page to 22 by typing SET PAGESIZE 22 at the first blank line in the file and then pressing Enter.
  9. You changed the number of characters per line to 45 by typing SET LINESIZE 45 in the next blank line and then clicking the X in top right corner to close the text editor.
  10. You saved your changes by clicking the Yes button. /li>
  11. You tested your query and the SQL*Plus environment settings you made by typing START CUST_BUY at the SQL> prompt and pressing Enter.
  12. You viewed the query results and then completed the exercise by clicking the Exit button.

SEMrush Software