| Lesson 4 | Transportable tablespaces |
| Objective | Define transportable tablespaces. |
Define Transportable Tablespaces
When copying large chunks of data from one database to another prior to Oracle, you had to choose among several options,
all of which were time-consuming and required you to create an intermediate file to hold the data. Oracle has introduced a new feature for copying or moving a set of tablespaces from one Oracle database to another, called the transportable tablespace. The transportable tablespace feature makes it as easy to move database data as it is to move a file from one location to another. Some of the uses for this feature are:
- Preparing data in one database and then copying the data to several distributed databases
- Gathering data into summarized historical tables, then moving the tablespace to your data warehouse
Question: Does the current release of Oracle support the transporting and cloning of tablespaces?
Yes, the current release of Oracle supports the transporting and cloning of tablespaces. There are two main methods for transporting and cloning tablespaces:
Both TTS and Data Pump are supported in the current release of Oracle. The choice of which method to use depends on your specific needs. If you need to move a tablespace quickly and easily, then TTS is a good option. If you need to move a tablespace that contains a large amount of data, then Data Pump is a better option.
Here are some of the benefits of transporting and cloning tablespaces:
Yes, the current release of Oracle supports the transporting and cloning of tablespaces. There are two main methods for transporting and cloning tablespaces:
- Transportable Tablespaces (TTS)
- Data Pump
Both TTS and Data Pump are supported in the current release of Oracle. The choice of which method to use depends on your specific needs. If you need to move a tablespace quickly and easily, then TTS is a good option. If you need to move a tablespace that contains a large amount of data, then Data Pump is a better option.
Here are some of the benefits of transporting and cloning tablespaces:
- You can move a tablespace from one database to another without having to take the database offline.
- You can clone a tablespace to create a new, identical tablespace.
- You can use transporting and cloning to migrate data between different platforms.
The current release of Oracle restricts the transporting and cloning of tablespaces. You can only do this between computers with the same
hardware, database block size, and database character set. This restriction will likely disappear in later releases as well.
Objects in the tablespaces that you wish to transport must not reference any object outside the tablespaces. The tablespaces must be totally self-contained. For example, let us say you select a tablespace that contains an index. The index is based on a table found in another tablespace. The initial tablespace cannot be transported by itself because it refers to something outside of itself. You could transport the two tablespaces as a set, however, assuming that the two only reference each other. Look at the following series of images below to see a demonstration of the steps for transporting a tablespace.
Objects in the tablespaces that you wish to transport must not reference any object outside the tablespaces. The tablespaces must be totally self-contained. For example, let us say you select a tablespace that contains an index. The index is based on a table found in another tablespace. The initial tablespace cannot be transported by itself because it refers to something outside of itself. You could transport the two tablespaces as a set, however, assuming that the two only reference each other. Look at the following series of images below to see a demonstration of the steps for transporting a tablespace.
Oracle Transportable Tablespaces
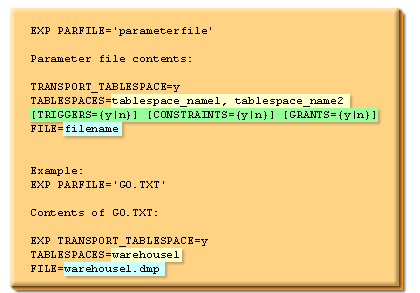
EXP PARFILE ='parameterfile'
Parameter file contents
Second step in the process is to export the tablespace. This screen shows the syntax of the command you will use and the actual export command used in our example. You create a parameter file that contains all the details needed to export the file. The green highlighted area show optional parameters that can save exporting time if used with the 'n' option. For example, if you know that there are no grants you wish to export, specify GRANTS =n and the export process will skip this portion of its routine.
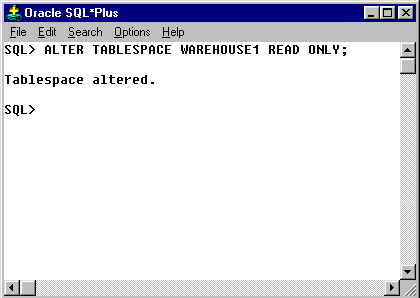
- First step in the process is to change the tablespace you wish to transport into READ ONLY status.
- Second step in the process is to export the tablespace. This screen shows the syntax of the command you will use and the actual export command used in our example.
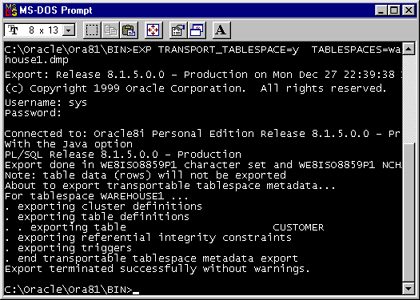
- Screen shot of the command line and status feedback that was created when exporting the example tablespace.
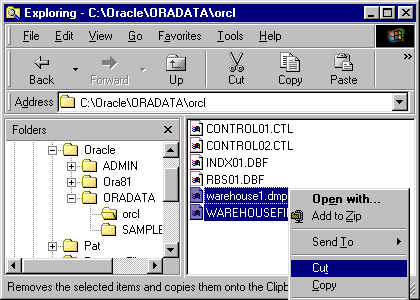
- The next step is to copy the export file just created and all the data files for the tablespaces to a location that is accessible by the target database
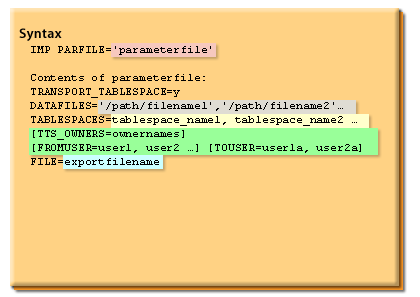
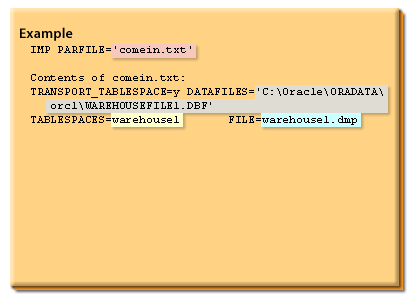
- Now use the import utility (IMP) to import the meta-data into the target database. This screen shows the syntax and the exact command for our sample tablespace, WAREHOUSE1.
- Here is a screen shot of the command line and status feedback that was created when importing the example tablespace.
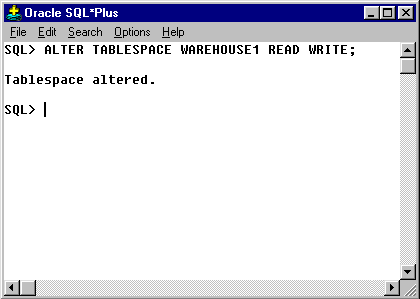
- You can now modify the tablespace so that it is in a READ WRITE state using the command show here.
The transporting of tablespaces as if they were ordinary files (except for the meta-data, which must be imported) reduces the time it takes to copy or move data from one database to another. In fact, the greater the size of the data files, the more time is saved compared to a "normal" export and import of the data.
Transportable TableSpaces - Exercise
Click the Exercise link below to practice creating a locally managed tablespace and exporting it for transport.
Transportable TableSpaces - Exercise
The next lesson looks into new features and enhancements you will use when handling READ ONLY tablespaces.
Transportable TableSpaces - Exercise
The next lesson looks into new features and enhancements you will use when handling READ ONLY tablespaces.