| Lesson 7 | Adding or modifying a column |
| Objective | Change columns in an existing table |
Adding or modifying Columns
The table you created has the right space allocation and constraints. The the inevitable happens and you need to make a change to the table's columns. This lesson lets you practice making changes to the columns in an existing table using the
ALTER TABLE command. There are several types of changes that can be handled using the ALTER TABLE command.
Some changes require a full reconstruction of the table.
Moving Dropping Column Restrictions
Oracle does not make it easy to change the position of a column or remove a column from a table. If you need to do either of these, you must drop the entire table and recreate the table with the new structure. If you have any data in the table, you must either forfeit the data (which may be okay for test tables) or save the data in another table so that you can restore it after you restructure the table. When you drop a table, even if you have saved the data, you must also be sure to restore all the other objects that were lost when you dropped the table, such as indexes and constraints. See the next module for more details on the effects of dropping a table. Avoid changing the order of columns in the table. In general, revising the order of the columns makes no difference in storage space or efficiency of performance.
The table below outlines the possible changes you can make to columns and what command is needed.
The syntax for changing a column is shown in the graphic below.
| Type of change | Use ALTER TABLE | Use DROP TABLE and then CREATE TABLE |
| Shorten column length | Yes (if all rows contain null values in this column) | |
| Lengthen column length | Yes | |
| Remove column | No | Yes |
| Add column to end of table | Yes | |
| Add column in middle of table | No | Yes |
| Reorder the columns | No | Yes |
Change NOT NULL to NULL | Yes | |
Change NULL to NOT NULL | Yes (if all rows contain data in this column) | |
| Change datatype of column | Yes (if all rows contain null values in this column) | |
| Rename a column | No | Yes |
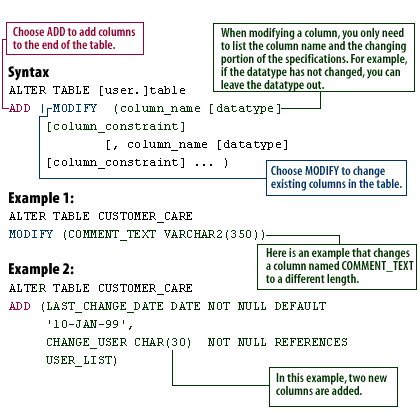
ALTER TABLE [user.]table
ADD | MODIFY (column_name [datatype]
              [column_constraint]
              [, column_name [datatype]
              [column_constraint] ... )
🧪 Example 1: Modifies an existing column:
ALTER TABLE CUSTOMER_CARE
MODIFY (COMMENT_TEXT VARCHAR2(350));
🧪 Example 2: *Adds two new columns:*
ALTER TABLE CUSTOMER_CARE
ADD (LAST_CHANGE_DATE DATE NOT NULL DEFAULT '10-JAN-99',
     CHANGE_USER CHAR(30) NOT NULL REFERENCES USER_LIST);
Changing Column
Provide an explanation of `MODIFY` vs `ADD`within the context of Oracle 23ai.
In Oracle 23ai, as in earlier versions of Oracle, the `ALTER TABLE` statement is used to change the structure of an existing table.
Two of the most commonly used clauses within this command are `ADD` and `MODIFY`. Here's a detailed comparison of the two:
🔄 `MODIFY` vs ➕ `ADD` in Oracle 23ai
🔧 `ADD` – Adds New Columns
🔁 `MODIFY` – Modifies Existing Columns
Invisible Columns (still usable with `ADD` and `MODIFY`):
Auto-Increment via Identity Columns (only `MODIFY` when changing properties):
⚠️ Caution
You cannot `MODIFY` a column to change its name and should use `RENAME` instead:
Changing Columns in Oracle Table
The follow series of imagesin the simulation help you practice changing the columns in a table.
🔄 `MODIFY` vs ➕ `ADD` in Oracle 23ai
| Feature | ADD | MODIFY |
|---|---|---|
| Purpose | Adds new columns to a table | Changes the definition of existing columns |
| Common Use Cases | Adding new fields such as created_by, updated_at |
Changing data types, size, nullability, or default values |
| Keyword Syntax | ALTER TABLE table_name ADD (column_name datatype); |
ALTER TABLE table_name MODIFY (column_name datatype); |
| Constraints | Can define new constraints (e.g., NOT NULL, DEFAULT) | Can alter constraints (e.g., make a column NOT NULL) |
| Oracle 23ai Compatibility | Fully supported, and can be used with newer features like Invisible Columns and Blockchain Tables | Supports newer constraints like ROW DROP or Auto-Increment when modifying columns |
🔧 `ADD` – Adds New Columns
ALTER TABLE employees
ADD (bonus NUMBER(7,2));
- Appends
bonuscolumn to theemployeestable. - All existing rows will have
NULLin this new column unless a default is specified.
🔁 `MODIFY` – Modifies Existing Columns
ALTER TABLE employees
MODIFY (last_name VARCHAR2(100));
- Changes the
last_namecolumn's size from, say, 50 to 100 characters. - Useful for adapting schema without dropping and recreating the column.
Invisible Columns (still usable with `ADD` and `MODIFY`):
ALTER TABLE employees ADD (legacy_code VARCHAR2(10) INVISIBLE);
Auto-Increment via Identity Columns (only `MODIFY` when changing properties):
ALTER TABLE invoices MODIFY (invoice_id GENERATED ALWAYS AS IDENTITY);
⚠️ Caution
You cannot `MODIFY` a column to change its name and should use `RENAME` instead:
ALTER TABLE employees RENAME COLUMN old_name TO new_name;Be careful with `MODIFY` on columns that are referenced by constraints, indexes, or foreign keys.

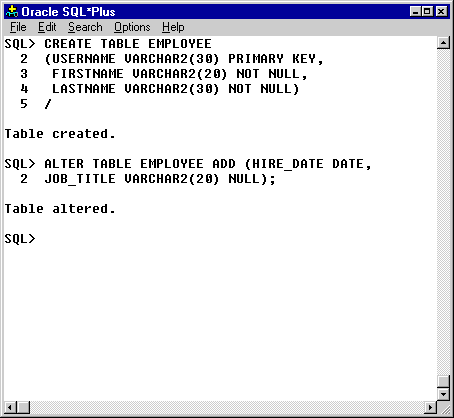
CREATE TABLE EMPLOYEE
(
  USERNAME    VARCHAR2(30) PRIMARY KEY,
  FIRSTNAME   VARCHAR2(20) NOT NULL,
  LASTNAME    VARCHAR2(30) NOT NULL
);
✔️ This creates an `EMPLOYEE` table with:
USERNAMEas the Primary KeyFIRSTNAMEandLASTNAMEas NOT NULL fields
✅ Step 2: Alter Table to Add Columns
ALTER TABLE EMPLOYEE
ADD (
  HIRE_DATE DATE,
  -- more columns can be added here
);
📌 *Note:* The image shows the beginning of an `ALTER TABLE ... ADD` command. The `HIRE_DATE` column of type `DATE` is being added, and line 2 is awaiting the next column (which is not shown).
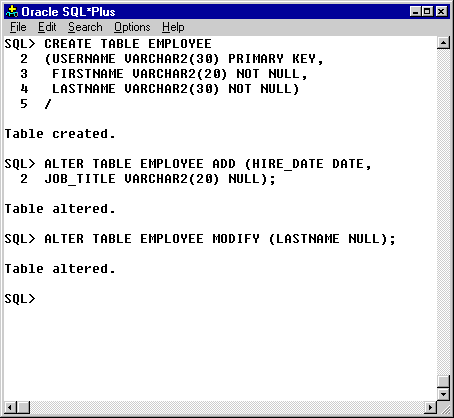
CREATE TABLE EMPLOYEE
(
  USERNAME   VARCHAR2(30) PRIMARY KEY,
  FIRSTNAME  VARCHAR2(20) NOT NULL,
  LASTNAME   VARCHAR2(30) NOT NULL
);
✔️ This creates an `EMPLOYEE` table with:
USERNAMEas the Primary KeyFIRSTNAMEandLASTNAMEas NOT NULL fields
✅ Step 2: Add Columns
ALTER TABLE EMPLOYEE
ADD (
  HIRE_DATE DATE,
  JOB_TITLE VARCHAR2(20)
);
📌 This adds two new nullable columns:
HIRE_DATE: DATE typeJOB_TITLE: VARCHAR2(20)
✅ Step 3: Modify Column Constraint
ALTER TABLE EMPLOYEE
MODIFY (LASTNAME NULL);
📌 This removes the `NOT NULL` constraint from the `LASTNAME` column, allowing it to accept null values. ✅ Step 4: Describe Final Table Structure
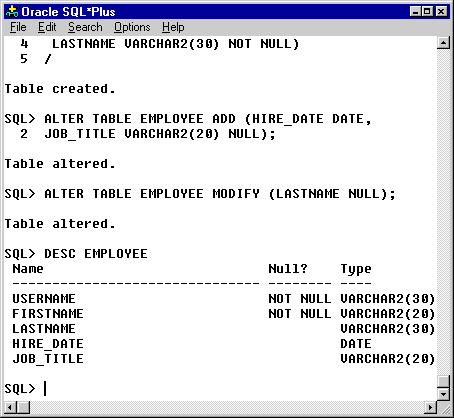
DESC EMPLOYEE;
Result:
| Name | Null? | Type |
|---|---|---|
| USERNAME | NOT NULL | VARCHAR2(30) |
| FIRSTNAME | NOT NULL | VARCHAR2(20) |
| LASTNAME | (nullable) | VARCHAR2(30) |
| HIRE_DATE | (nullable) | DATE |
| JOB_TITLE | (nullable) | VARCHAR2(20) |
The next lesson shows you how to drop tables and constraints.
Adding and Modifying Columns
- In this simulation, you have just created a table, as seen in this screen. Your next task is to add two new columns that were forgotten. The
command has been started for you. One column, HIRE_DATE, will be added. Add another column named JOB_TITLE with a datatype of VARCHAR2(20) by typing this line and pressing Enter:
>
JOB_TITLE VARCHAR2(20) NULL);
- Good. You have now added the two new columns. Another change is needed:
Allow null values in the LASTNAME column. Type the following command at the SQL> prompt and press Enter:
>
ALTER TABLE EMPLOYEE MODIFY (LASTNAME NULL);
- To view the current structure of the EMPLOYEE table, type the following SQL*Plus command and press Enter:
>
DESC EMPLOYEE
- The table has two new columns: HIRE_DATE and JOB_TITLE. The LASTNAME column no longer displays the NOT NULL constraint. This is the end of the simulation. Click the Exit button.
Adding Modifying Column-Exercise
Click the Exercise link below to practice adding and modifying columns.
Adding Modifying Column-Exercise
Adding Modifying Column-Exercise