| Lesson 6 | Nested table queries with PL/SQL |
| Objective | Write a PL/SQL procedure that retrieves nested table data. |
PL/SQL Procedure for Nested Table Queries (Cursor and FOR LOOP Pattern)
Why PL/SQL for Nested Table Retrieval?
SQL TABLE() vs PL/SQL Cursor — Choosing the Right Tool
The SQL TABLE() correlated join from lesson 3 flattens a nested table into a result set efficiently — it is the correct choice when the goal is to retrieve, filter, or aggregate element data in a single query. The result travels directly from the database engine to the application or reporting layer without intermediate processing.A PL/SQL cursor block is the correct choice when the retrieval involves row-by-row logic that SQL cannot express: conditional branching based on element values, formatted multi-line output combining parent-row attributes and nested element attributes, exception handling per row, or calling stored subprograms for each retrieved record. The PL/SQL block gives the developer an imperative, procedural handle on the data that the declarative SQL engine does not provide.
When PL/SQL Gives You More Control
Querying SALE_HEADER with its DETAIL_NEST nested table column illustrates the PL/SQL advantage clearly. A SQL query can return all sale records and their flattened detail elements, but it cannot easily produce formatted output that groups each sale's header information followed immediately by its detail lines — with a separator between sales. A PL/SQL block with an outer cursor loop and an inner nested table element loop produces exactly that structure, iterating one sale at a time and processing each detail element within the context of its parent sale.The SALE_HEADER Schema — Parent-Child Relationship
SALE_HEADER and SALE_DETAIL — One-to-Many
The SALE_HEADER object table includes two basic parts: the SALE_HEADER object type (the parent), which stores sale-level attributes such as sale_id and customer_name, and the SALE_DETAIL object type (the child), which is implemented as a nested table column named detail_nest within SALE_HEADER. A parent-child, one-to-many relationship exists between these two object types — one SALE_HEADER row can have multiple SALE_DETAIL elements stored in its detail_nest collection.This one-to-many relationship is precisely what makes the dual FOR LOOP necessary in PL/SQL. The outer loop iterates over SALE_HEADER rows using the cursor; for each parent row retrieved, the inner loop iterates over the nested table elements within that row's detail_nest collection. Without the inner loop, the PL/SQL block could only access the collection as a whole — not the individual detail items within it.
Why Two FOR LOOPs Are Required
A single loop structure cannot traverse two dimensions of data simultaneously. The cursor loop operates at the dimension of SALE_HEADER rows — one iteration per sale. Within each sale, detail_nest is a collection containing zero or more SALE_DETAIL elements. To access those elements individually, a second loop is required — one that iterates from the first element (index 1) to the last element (index nested_data.COUNT). The outer loop controls which sale is being processed; the inner loop controls which detail element within that sale is being processed.
The Complete PL/SQL Block — Figure m4-7.1
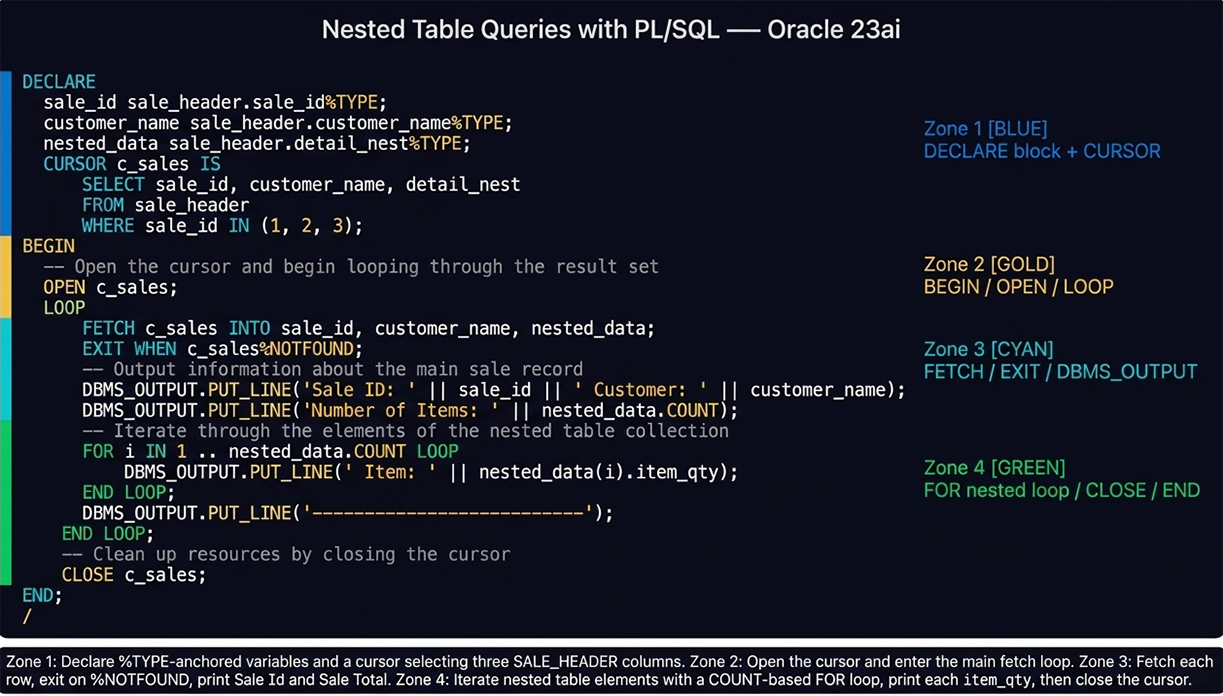
DECLARE
    sale_id       sale_header.sale_id%TYPE;
    customer_name sale_header.customer_name%TYPE;
    nested_data   sale_header.detail_nest%TYPE;
    CURSOR c_sales IS
        SELECT sale_id, customer_name, detail_nest
        FROM   sale_header
        WHERE  sale_id IN (1, 2, 3);
BEGIN
    -- Open the cursor and begin looping through the result set
    OPEN c_sales;
    LOOP
        FETCH c_sales INTO sale_id, customer_name, nested_data;
        EXIT WHEN c_sales%NOTFOUND;
        -- Output information about the main sale record
        DBMS_OUTPUT.PUT_LINE('Sale ID: '         || sale_id
                          || ' Customer: '        || customer_name);
        DBMS_OUTPUT.PUT_LINE('Number of Items: ' || nested_data.COUNT);
        -- Iterate through the elements of the nested table collection
        FOR i IN 1..nested_data.COUNT LOOP
            DBMS_OUTPUT.PUT_LINE(' Item: ' || nested_data(i).item_qty);
        END LOOP;
        DBMS_OUTPUT.PUT_LINE('----------------------------');
    END LOOP;
    -- Clean up resources by closing the cursor
    CLOSE c_sales;
END;
/
Zone-by-Zone Walkthrough
Zone 1 — DECLARE: %TYPE Variables and Cursor Definition
The DECLARE section establishes three variables — sale_id, customer_name, and nested_data — each anchored to its corresponding column using %TYPE. The cursor c_sales defines the SQL query that the block will execute: SELECT sale_id, customer_name, detail_nest FROM sale_header WHERE sale_id IN (1, 2, 3). The WHERE clause restricts the result to three specific sales; in production code this would typically be a parameter passed to a stored procedure rather than a literal IN list.The cursor definition in the DECLARE section does not execute the query — it only stores the query's definition. Execution begins when OPEN c_sales is called in the BEGIN section. Separating definition from execution is the key characteristic of explicit cursors in PL/SQL.
Zone 2 — BEGIN: OPEN and LOOP
The BEGIN section opens the execution section of the block. OPEN c_sales executes the cursor's SELECT statement and positions the cursor before the first row of the result set. The LOOP keyword begins an infinite loop — it has no built-in termination condition. Termination is controlled by the EXIT WHEN statement inside the loop, which fires when the FETCH returns no more rows.
Zone 3 — FETCH, EXIT WHEN %NOTFOUND, DBMS_OUTPUT
FETCH c_sales INTO sale_id, customer_name, nested_data retrieves one row from the cursor's result set into the three declared variables. The variables receive values in the order they appear in both the FETCH INTO list and the cursor's SELECT list — positional correspondence is required. After the FETCH, EXIT WHEN c_sales%NOTFOUND tests the cursor attribute %NOTFOUND. If the FETCH retrieved no row because the result set is exhausted, %NOTFOUND evaluates to TRUE and the loop terminates. If a row was retrieved, %NOTFOUND is FALSE and execution continues.
The two DBMS_OUTPUT.PUT_LINE calls print the parent-row attributes: the first line combines sale_id and customer_name; the second line prints the count of detail elements in the nested_data collection using the COUNT collection method. This gives the reader immediate context — how many items belong to this sale — before the inner loop prints each one.
Zone 4 — Inner FOR LOOP, CLOSE, END
The inner FOR loop — FOR i IN 1..nested_data.COUNT LOOP — iterates from index 1 to the number of elements currently in the nested_data collection. For each index i, nested_data(i).item_qty accesses the item_qty attribute of the i-th element. The dot notation (nested_data(i).item_qty) navigates from the collection variable through the element at index i to the specific attribute — this is the PL/SQL equivalent of the SQL table alias and column reference used in TABLE() queries.
The separator line (PUT_LINE('----------------------------')) after the inner loop visually separates each sale's output block from the next. After the outer loop's EXIT WHEN terminates iteration, CLOSE c_sales releases the cursor's resources — the memory used to hold the result set and the cursor state. Closing the cursor after use is a PL/SQL best practice; unclosed cursors consume session resources until the session ends.
Key PL/SQL Concepts in This Block
%TYPE Anchoring — Why It Matters
Each variable in the DECLARE section is defined using %TYPE rather than an explicit data type. sale_header.sale_id%TYPE tells Oracle to use whatever data type the sale_id column is defined as in the SALE_HEADER table — NUMBER, INTEGER, or any other type — as the variable's type. If the column's data type changes in a future schema modification, the variable's type updates automatically the next time the block is compiled, without requiring any change to the PL/SQL code.%TYPE anchoring eliminates a common class of bugs where the variable type and the column type diverge — for example, a column defined as NUMBER(10) that the developer has declared as NUMBER(8) in the PL/SQL block, which silently truncates values. Anchoring to the column guarantees type compatibility throughout the block's lifetime.
Explicit Cursor Pattern — OPEN / FETCH / EXIT / CLOSE
The explicit cursor pattern used in this block has four steps that always appear in the same order. OPEN executes the query and positions the cursor before the first row. FETCH retrieves one row per call and advances the cursor position. EXIT WHEN %NOTFOUND terminates the loop when no more rows are available. CLOSE releases cursor resources. This four-step pattern is the foundation of explicit cursor programming in PL/SQL — deviating from it (for example, forgetting CLOSE, or fetching after %NOTFOUND) produces memory leaks or incorrect results.
The Cursor FOR LOOP — A Concise Alternative
Oracle provides a more concise cursor FOR LOOP construct that handles OPEN, FETCH, and CLOSE automatically, leaving only the loop body for the developer to write. The cursor FOR LOOP is the preferred form in Oracle 23ai for straightforward cursor iteration:
-- Cursor FOR LOOP — Oracle 23ai preferred form for simple iteration
DECLARE
    CURSOR c_sales IS
        SELECT sale_id, customer_name, detail_nest
        FROM   sale_header
        WHERE  sale_id IN (1, 2, 3);
BEGIN
    FOR rec IN c_sales LOOP
        DBMS_OUTPUT.PUT_LINE('Sale ID: '         || rec.sale_id
                          || ' Customer: '        || rec.customer_name);
        DBMS_OUTPUT.PUT_LINE('Number of Items: ' || rec.detail_nest.COUNT);
        FOR i IN 1..rec.detail_nest.COUNT LOOP
            DBMS_OUTPUT.PUT_LINE(' Item: ' || rec.detail_nest(i).item_qty);
        END LOOP;
        DBMS_OUTPUT.PUT_LINE('----------------------------');
    END LOOP;
    -- No explicit OPEN or CLOSE required
END;
/
The cursor FOR LOOP implicitly opens the cursor when the loop begins, fetches one row per iteration into the rec record variable, and closes the cursor when the loop exits — either through exhaustion of rows or an EXIT statement. The rec variable provides attribute access using dot notation (rec.sale_id, rec.customer_name, rec.detail_nest). The three separate variable declarations from the explicit form are replaced by the single implicit record variable rec.
DBMS_OUTPUT.PUT_LINE — Enabling and Using
DBMS_OUTPUT.PUT_LINE writes a line of text to the DBMS_OUTPUT buffer. To see the output in Oracle SQL Developer or SQL*Plus, the server output feature must be enabled before the block runs:
-- Enable DBMS_OUTPUT before running the block
SET SERVEROUTPUT ON;

-- Or in Oracle SQL Developer: View menu → DBMS Output → enable

-- Then run the block
DECLARE
    ...
BEGIN
    ...
    DBMS_OUTPUT.PUT_LINE('Sale ID: ' || sale_id);
    ...
END;
/Running the Block in Oracle 23ai Tools
Oracle SQL Developer
Open a SQL Worksheet connected to the schema containing SALE_HEADER. Enable DBMS_OUTPUT through the View menu → DBMS Output panel, then click the green plus icon to enable output for the current connection. Paste the complete block into the worksheet, press F5 (Run Script) rather than F9 (Run Statement) — F5 executes the entire block and shows the DBMS_OUTPUT results in the Script Output tab. F9 would attempt to execute only the current statement, which fails for multi-statement PL/SQL blocks.LiveSQL (Oracle Cloud)
Oracle LiveSQL at livesql.oracle.com provides a free browser-based Oracle 23ai environment. Create an account, open the SQL Workshop, and paste the block into the editor. Click Run — LiveSQL executes the block and displays DBMS_OUTPUT in the Script Output panel automatically. LiveSQL is the fastest way to test PL/SQL blocks against an Oracle 23ai database without a local installation.SQL*Plus
In SQL*Plus, type SET SERVEROUTPUT ON before pasting or running the block. SQL*Plus is a command-line tool — it executes PL/SQL blocks entered directly or from a script file using the @ command. The forward slash (/) on a line by itself after END; submits the block for execution. SQL*Plus remains the standard tool for script-based deployment in Oracle database administration workflows.
The next lesson will wrap up this module.