| Lesson 6 | Recreating Redo Log Files |
| Objective | Describe the Steps to recreate Inactive Redo Logs |
Recreate Inactive Redo Logs in Oracle 19c
Recreating inactive redo logs in Oracle 19c involves several careful steps to ensure the integrity and availability of your database. Redo logs are crucial for data recovery and consistency, so it's important to handle them with caution. Below is a step-by-step guide on how to recreate inactive redo logs, including necessary precautions and SQL commands.
Overview
Prerequisites:
Steps:
Detailed Steps
Additional Considerations
Precautions and Best Practices
Summary
Recreating inactive redo logs in Oracle 19c involves careful planning and execution. By following the steps outlined above, you can safely drop and recreate inactive redo log groups to:
Always ensure that you have adequate backups and that you understand each step before performing it on a production database.
Example Scenario
Objective: Move redo log group 2 to a new disk with increased size.
Steps:
Final Notes
By carefully following these instructions, you can successfully recreate inactive redo logs in Oracle 19c, ensuring your database continues to operate smoothly and efficiently.
Overview
Prerequisites:
- You must have DBA privileges.
- Ensure you have a recent backup of your database.
- The redo logs to be recreated must be in the INACTIVEstate.
Steps:
- Identify Inactive Redo Logs
- Force Log Switches (If Necessary)
- Drop the Inactive Redo Log Groups
- Recreate the Redo Log Groups
- Verify the New Redo Logs
Detailed Steps
- 1. Identify Inactive Redo Logs:
First, determine which redo log groups are inactive and eligible for recreation.
SQL Commands:-- Check the status of redo log groups SELECT GROUP#, STATUS FROM V$LOG; -- List the redo log files and their group associations SELECT GROUP#, MEMBER FROM V$LOGFILE ORDER BY GROUP#;
Explanation:- V$LOG View: Shows the status of each redo log group.
- STATUS Values:- CURRENT: The log group being currently written to.
- ACTIVE: Needed for instance recovery but not the current group.
- INACTIVE: No longer needed for instance recovery.
- V$LOGFILE View: Lists all redo log file members and their associated groups.
Example Output:| GROUP# | STATUS | |--------|----------| | 1 | CURRENT | | 2 | INACTIVE | | 3 | INACTIVE |
- V$LOG View: Shows the status of each redo log group.
- Force Log Switches (If Necessary):
If the redo logs you want to recreate are not in the INACTIVE state, you need to force a log switch to make them inactive.
SQL Commands:
-- Force a log switch
ALTER SYSTEM SWITCH LOGFILE;

-- If in ARCHIVELOG mode, force archiving
ALTER SYSTEM ARCHIVE LOG CURRENT;
Repeat the log switch until the desired redo log group becomes INACTIVE.
Explanation:- SWITCH LOGFILE: Forces the database to switch to the next redo log group.
- ARCHIVE LOG CURRENT: Archives the current redo log (applicable if the database is in ARCHIVELOG mode).
Precaution:
Perform log switches during low-activity periods to minimize the impact on performance. - Drop the Inactive Redo Log Groups:
Now that the redo log groups are inactive, you can safely drop them.
SQL Commands:
-- Drop the redo log group
ALTER DATABASE DROP LOGFILE GROUP <group_number>;
Replace <group_number> with the actual group number you wish to drop.
Example:
ALTER DATABASE DROP LOGFILE GROUP 2;
Explanation:
- Dropping a redo log group removes all members (files) associated with that group from the control file.
Precaution:- You cannot drop the CURRENT redo log group.
- Ensure that at least two redo log groups remain after dropping to maintain database recoverability.
- You cannot drop the CURRENT redo log group.
- Recreate the Redo Log Groups
Add new redo log groups with the desired size and location.
SQL Commands:
-- Add a new redo log group
ALTER DATABASE ADD LOGFILE GROUP <group_number> (
    '<path_to_logfile1>',
    '<path_to_logfile2>'
) SIZE <size_in_MB> M REUSE;
Replace:- <group_number>: The group number (ideally, reuse the dropped group's number for consistency).
- <path_to_logfileX>: The full path where the new redo log files will reside.
- <size_in_MB>: The size of the redo log files in megabytes.
Example:
ALTER DATABASE ADD LOGFILE GROUP 2 (
    '/u01/oradata/ORCL/redo02a.log',
    '/u02/oradata/ORCL/redo02b.log'
) SIZE 100M REUSE;
Explanation:- ADD LOGFILE GROUP: Creates a new redo log group with specified members.
- SIZE: Specifies the size of each redo log file.
- REUSE: Allows reuse of existing files if they exist (be cautious with this option).
Precautions:- Ensure the specified paths have sufficient disk space.
- If multiplexing redo logs, specify multiple member files on different disks for redundancy. use the REUSE option unless you are certain that overwriting existing files is safe.
- Verify the New Redo Logs:
After recreating the redo logs, confirm that they have been added correctly and are functioning as expected.
SQL Commands:
-- Verify redo log groups and their statuses
SELECT GROUP#, STATUS FROM V$LOG;

-- Verify redo log file members
SELECT GROUP#, MEMBER FROM V$LOGFILE ORDER BY GROUP#;
Explanation:- Check that the new redo log group appears in the V$LOG and V$LOGFILE views.
- Ensure the statuses are appropriate (new groups may show as UNUSED until they are first written to).
Optional Test:- Perform a log switch to test the new redo log group:
ALTER SYSTEM SWITCH LOGFILE;
Additional Considerations
- A. Archivelog Mode:
If your database is running in ARCHIVELOGmode, additional steps are necessary:- Ensure All Redo Logs Are Archived:
ALTER SYSTEM ARCHIVE LOG ALL;
- Check Archiving Status:
SELECT DEST_ID, STATUS FROM V$ARCHIVE_DEST_STATUS;
- Ensure All Redo Logs Are Archived:
- B. Backup and Recovery:
Backup Control File: It's a good practice to backup the control file after making structural changes:
ALTER DATABASE BACKUP CONTROLFILE TO '
/controlfile.bkp'; - C. Multiplexing Redo Logs:
- Redundancy:
For fault tolerance, multiplex redo logs by adding multiple members in different locations:
ALTER DATABASE ADD LOGFILE MEMBER '
' TO GROUP ; - Example:
ALTER DATABASE ADD LOGFILE MEMBER '/u03/oradata/ORCL/redo02c.log' TO GROUP 2;
- Redundancy:
- D. Resizing Redo Logs
- If the goal is to resize the redo logs, specify the new size in the ADD LOGFILE command.
- Ensure all redo log groups are of the same size for optimal performance.
Precautions and Best Practices
- Perform During Maintenance Window: Schedule this operation during a period of low database activity.
- Full Database Backup: Always take a full backup before making structural changes.
- Do Not Drop All Redo Logs: Maintain at least two redo log groups to keep the database operational.
- Monitor Alert Logs: Check the Oracle alert log for any errors or warnings during the process.
- Test in a Non-Production Environment: If possible, test the procedure in a development or staging environment first.
Summary
Recreating inactive redo logs in Oracle 19c involves careful planning and execution. By following the steps outlined above, you can safely drop and recreate inactive redo log groups to:
- Move redo logs to a different storage location.
- Resize redo log files for performance tuning.
- Replace corrupted redo log files.
Always ensure that you have adequate backups and that you understand each step before performing it on a production database.
Example Scenario
Objective: Move redo log group 2 to a new disk with increased size.
Steps:
- Identify Redo Log Group 2 as INACTIVE:
SELECT GROUP#, STATUS FROM V$LOG WHERE GROUP# = 2;
- Force Log Switches Until Group 2 Becomes INACTIVE:
ALTER SYSTEM SWITCH LOGFILE;
- Drop Redo Log Group 2:
ALTER DATABASE DROP LOGFILE GROUP 2;
- Recreate Redo Log Group 2 with New Location and Size:
ALTER DATABASE ADD LOGFILE GROUP 2 (
   '/new_disk/oradata/ORCL/redo02a.log',
   '/new_disk/oradata/ORCL/redo02b.log'
) SIZE 200M;
- Verify the New Configuration:
SELECT GROUP#, STATUS FROM V$LOG;
SELECT GROUP#, MEMBER FROM V$LOGFILE WHERE GROUP# = 2;
- Backup Control File (Optional but Recommended):
ALTER DATABASE BACKUP CONTROLFILE TO '/backup/controlfile_after_redo_log_change.bkp';
Final Notes
- Consult Documentation: Refer to the [Oracle 19c Documentation](https://docs.oracle.com/en/database/oracle/oracle-database/19/index.html) for detailed information.
- Seek Assistance if Needed: If unsure, consult with a senior DBA or Oracle Support.
- Automate with Caution: Avoid automating these steps in scripts unless thoroughly tested.
By carefully following these instructions, you can successfully recreate inactive redo logs in Oracle 19c, ensuring your database continues to operate smoothly and efficiently.
ALTER DATABASE CLEAR LOGFILE
The
ALTER DATABASE CLEAR LOGFILE command drops and recreates the corrupt online redo file, but you can also perform this process manually. It's a helpful procedure to know if the ALTER DATABASE CLEAR LOGFILE command fails and reusing the currently configured log file name to recreate the log file becomes impossible. You may preview all the steps below.
- Steps to recreate an Inactive Online Redo Log
To recreate an inactive online redo log manually, do the following:- Find a location to recreate the online redo log.
- Drop the damaged or lost log file.
- Add the log group.
- Open the database and do not forget to multiplex all redo logs to reduce the chance of losing data.
Recovering from Loss of Multiplexed Redo Log File
When one of the multiplexed members of any group is corrupted or accidently dropped, the LGWR process ignores it and writes the information to the only available member. The following scenario gives a demonstration to easily understand the main concept:
Add one member to each redo log group. Query all redo log members and their status:
SQL>
select
 b.group#, a.status, b.status, b.member
 from
  v$log a, v$logfile b
  where
   a.group#=b.group#
   order by
   1,2;
Add one member to each redo log group. Query all redo log members and their status:
GROUP# STATUS         MEMBER
 ----  ------------  --------------------------------
1 			CURRENT        /u01/oracle/product/10.2.0/db_1/ora
                      data/testdb/redo01.log
2 			INACTIVE       /u01/oracle/product/10.2.0/db_1/ora
                      data/testdb/redo02.log
3 			ACTIVE         /u01/oracle/product/10.2.0/db_1/ora
                      data/testdb/redo03.log
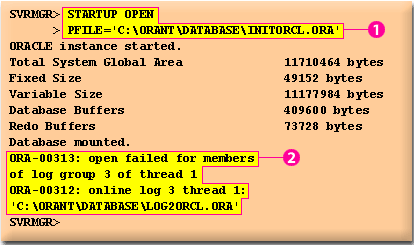
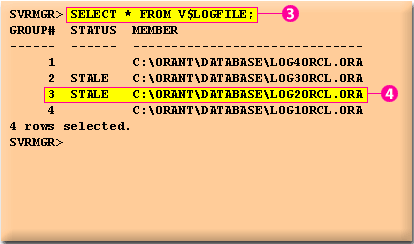
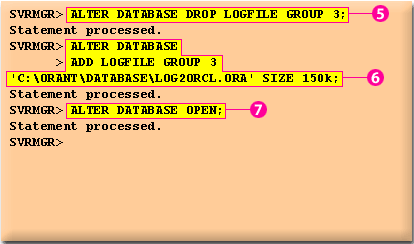
The following series of images demonstrates how to perform an inactive redo log recovery.


The command lines and their results for the whole process are displayed below.
SQL> STARTUP OPEN PFILE='C:\ORANT\DATABASE\INITORCL.ORA'
ORACLE instance started.
Total System Global Area                         11710464 bytes
Fixed Size                                          49152 bytes
Variable Size                                    11177984 bytes
Database Buffers                                   409600 bytes
Redo Buffers                                        73728 bytes
Database mounted.
ORA-00313: open failed for members of log group 3 of thread 1
ORA-00312: online log 3 thread 1: 'C:\ORANT\DATABASE\LOG2ORCL.ORA'
SQL> SELECT * FROM V$LOGFILE;
GROUP#     STATUS  MEMBER
------     ------- ----------------------------------------------
     1             C:\ORANT\DATABASE\LOG4ORCL.ORA
     2      STALE  C:\ORANT\DATABASE\LOG3ORCL.ORA
     3      STALE  C:\ORANT\DATABASE\LOG2ORCL.ORA
     4             C:\ORANT\DATABASE\LOG1ORCL.ORA
4 rows selected.
SQL> ALTER DATABASE DROP LOGFILE GROUP 3;
Statement processed.
SQL> ALTER DATABASE ADD LOGFILE GROUP 3 'C:\ORANT\DATABASE\LOG2ORCL.ORA' SIZE 150k;
Statement processed.
SQL> ALTER DATABASE OPEN;
Statement processed.
SQL>
The next lesson demonstrates how to obtain recovery status information through the data dictionary views.