| Lesson 2 | Updating Records |
| Objective | Update a database using a recordset object and bound controls. |
Updating Database Records
In this lesson, you will learn how to use Visual Sutdio to update existing information in the VirtualBookShelf.com database.
SQL statements are not needed because we will use methods built into the recordset object. Specifically, we'll use the recordset object's updateRecord method. Using the Recordset and Textbox Design Time controls together makes it incredibly easy to update table rows. As you will see, only one line of script needs to be entered. The simulation that follows shows you how to add functionality to update customer information. It uses the file CustManage.asp to display a record and accept updates. You can download this file from the Resources page.
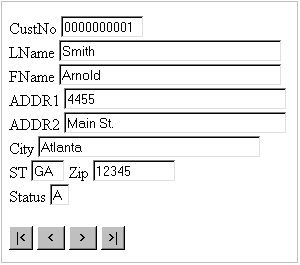
The image below shows this file displayed in a web browser.
SQL statements are not needed because we will use methods built into the recordset object. Specifically, we'll use the recordset object's updateRecord method. Using the Recordset and Textbox Design Time controls together makes it incredibly easy to update table rows. As you will see, only one line of script needs to be entered. The simulation that follows shows you how to add functionality to update customer information. It uses the file CustManage.asp to display a record and accept updates. You can download this file from the Resources page.
The image below shows this file displayed in a web browser.
Now, let usroll up our sleeves and add an update button to the VirtualBookShelf.com Web site.
Updating customer --->Data Using Recordset Object
In the next lesson, you will see that the same process is used to add an Insert function.
Updating customer --->Data Using Recordset Object
Updating Customer Data using the Recordset Object and Bound Controls
-
We begin by opening CustManage.asp in the source editor. This file already contains a Recordset DTC and several Textbox DTCs that contain the customer data. A RecordsetNavBar DTC is also included to navigate forward and backward in the recordset. To add an update button, you need to do drag a Button DTC into the page and drop it just above the
</BODY>tag. For the purpose of this simulation, just click Button on the left side of the screen and we'll drag it to the appropriate place. - Notice the button has been inserted into the document. Now, you need to set the button's properties. Right-click the button.
- The menu is displayed. Select Properties.
- Give the button a descriptive name to make it easier to remember and recognize it in the script. Enter
UpdateBtnin the Name field. And, to avoid looking like an amateur, change the button caption in the browser from "Button 1" to something that actually indicates it's function. EnterUpdatein the Caption field and those are all the properties that you need to set. Click OK. - Enter Update in the Caption field. Those are all the properties that need to be set. Click OK.
- Here is the completed button. Now you can add functionality to the button so that it can do some useful work. To do this, you will need to open the Script Outline window. Single click View on the drop-down menu.
- Now, place the mouse pointer over Other Windows to /display a list of available windows. However, for the purpose of this simulation, you will need to click Other Windows.
- Now simply click Script Outline.
- Expand Server Objects & Events by clicking the + to the left of Server Objects & Events folder.
- A list of objects in the current page is displayed. You use the outline view to easily add code to the objects. Next, expand the UpdateBtn so that its onclick event is displayed. Click the + to the left of UpdateBtn.
- You need to add an event handler called onclick to the UpdateBtn. The event handler will be called when the Update button is clicked in the browser. Double-click onclick.
- You can see that the event handler code block appears in the source editor. Now, to update the customer record when the button is clicked, you still need to add some code.
Only one statement is needed. It's a call to the recordset object's updateRecord method. Enter the following statement between the Sub and End Sub statements:
CustRecords.updateRecord. Then, all the work to update a customer row will be done. Before viewing it in the browswer, you normally would need to save the page. But, for the purpose of this simulation, you can assume it's been saved. Right-click in the source editor to view the page in the browser. - Select View in Browser from the menu.
- Select View in Browser from the menu.
- You want to change the Addr1 field. Enter
4475in the Addr1 text box. A click on the Update button will save the new information. - We are done! This might have seemed like a lot to add the button and the event handler, but it really wasn't very much. All that we did was drag the button onto the page, set a couple of properties, and add the event handler. Click the Update button to save your changes. This is the end of the simulation.
In the next lesson, you will see that the same process is used to add an Insert function.