Set the Cascade Update and Cascade Delete options for relationships.
Using Cascade Update, Cascade Delete Options
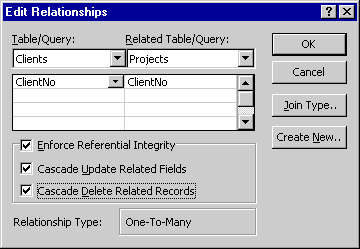
It would be very hard to use Access with referential integrity in place if you did not have any ability to delete and update records in tables where there are other related records. There are some cases where you will definitely want to make sure records in tables cannot be deleted for historical purposes. However, there may be some cases where you do not care whether records are deleted, as long as the related records are deleted or updated to reflect the change. Using Cascade Update and Cascade Delete allows you to specify that you want records to be updated and deleted, and is really quite straightforward. If you look at the Edit Relationships dialog by double-clicking a join line for a relationship, you will see the options below the Referential Integrity check box, displayed below:
Edit Relationship options including 1) Enforce Referential Integrity 2) Cascade Update Related Fields
Choose Options
Once the options have been chosen, they will affect your database by allowing you to update the one side of a one-to-many relationship, and have it reflected in related tables, as well as delete all related records in related tables. Here is more information about the individual options.
Cascade Update: This option is useful mainly when you have a primary key field that can be modified. If Cascade Update is set to Yes, then when that value is modified, all the records related have the value modified as well.
Cascade Delete: Cascade Delete causes any records in related tables to be deleted along with the deletion of the current record. For example, if you were to delete a record in the Clients table, you would also be deleting any records in the Projects table with that particular ClientNo.
Note: If any of the tables related to Projects do not have Cascade Delete set to Yes, they will receive the referential integrity error message that you are not able to delete or change the record. Because you will undoubtedly use the Cascade Delete option to a greater extent than Cascade Update, work with this simulation to get more practice.
Using Cascade Delete in MS Access
To start off the simulation, here is the Clients table in datasheet view. The record you will work with is already highlighted.
First thing is to see what happens when referential integrity is turned on, without Cascade Delete set to Yes. Press the Delete key.
This is the message received when referential integrity is turned on, without Cascade Delete set to Yes. Now it is time to go set Cascade Delete to Yes. Click OK.
Close the Clients table by clicking the second “x” down from the top right-hand corner.
Click the Tools menu choice.
Now click the Relationships… option in the Tools menu.
Here is the now familiar Relationships Layout window. Double-click the line between the Clients and Projects tables.
Now you can see the Edit Relationships dialog. Click the Cascade Delete Related Records option.
That’s all there is to do for the relationship between Clients and Projects. Click OK.
As you can see here in the Relationships Layout window, you still have to set the Cascade Delete option for the Projects and Hours relationship. Doubleclick the line between the Projects and Hours tables.
Once again you can see the Edit Relationships dialog. Click the Cascade Delete Related Records option.
Click the OK button to accept the change.
Now you are again brought back to the Relationships Layout window. All the changes necessary have been made. Now it’s time to test the changes. Click the second “x” down from the top right-hand corner.
To test the changes made we need to open the Clients table in Datasheet view again. Click the Open button.
Now click the record selector for the record of “Textiles International.” This is the gray button located on the left of the record.
Ok, now is the moment of truth. Press the Delete key and see what happens.
This is the message you will now receive because Cascade Delete is now turned on for all relationships of Clients.
The next lesson is the module wrap-up and you will get a brief review of the topics you have covered in this module.