Creating an Access macro by using the Macro Builder
Objective
Use the Access Macro Builder to create and run an Access macro.
Creating Access Macro using Macro Builder
Now that you have some idea of where Access macros are used, let us take a look at how they are created by using the Macro Builder.
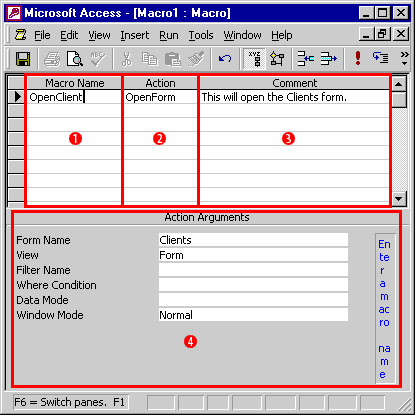
First, let us take a look at this MouseOver of the Access Macro Builder, showing you how to open the Clients form by using a macro.
Microsoft Access - [Macro1 : Macro]
Macro Name    |    Action       |    Comment
------------------------------------------------------
OpenClient     |    OpenForm    |    This will open the Clients form.

Action Arguments:
--------------------------------
Form Name: Clients
View: Form
Filter Name: (empty)
Where Condition: (empty)
Data Mode: Normal
Window Mode: Normal

F6 = Switch panes. F1
Access Macro Builder consisting of 1) Macro Name, 2) Action, 3) Comment, and 4) Action Arguments
Macro Name: This is where you type the name of the macro.
Action: This is a list of macro Actions from which you can select.
Comment: This column is used for documenting your macros. By documenting your macros you can remember what the purpose was for the macro and also help others who have to help maintain the macro.
Action Arguments: Action Arguments specify the parameters used with each action. They will change based on the Action you choose.
Embedded Macros in Access
An embedded macro is a macro object that is stored directly in an event property for a form, report, or control.
These macros have two advantages over VBA and macro objects.
If you have ever copied a control that had code behind it and then wished that the code also was duplicated, this feature is for you.
Because these macros are part of a control's properties, the macro that is associated with a control event is also copied.
You no longer need separate macro objects that perform small, simple one-off tasks. These macros can be associated directly with an event property.
To create an embedded macro, choose Macro Builder from an event property's Choose Builder dialog box.
Once you create the macro, the event property changes to [Embedded Macro].
To take advantage of these benefits, the wizards in Access 2010 are updated to create embedded macros in the new format database (ACCDB).
This is because VBA code is not allowed to execute in Disabled mode, meaning that wizard-generated code would not run unless a database is trusted. By using macros, the wizards now allow the application to run as much as possible in Disabled mode without failing.
For backward compatibility, VBA code is still created using the wizards in the previous file formats (MDB and ADP), but they have been updated to use the RunCommand method where appropriate.
That's right, the wizards no longer create code that calls DoMenuItem.
To create a new macro in Access, follow the steps below:
Click the Macros list in the Database window.
Click the New button. You will be presented with a blank Macro Builder.
Specify the Macro Name.
Pick the Macro Action to perform.
Type in a comment to document your macro.
Fill in the Action Arguments.
You have now completed the macro.
There are 54 possible macro actions that you can use, which allow you to automate transferring objects back and forth between your database and another Access database or file format.
For help on any of the actions select the item from the list and press F1.
The following section discusses how to create a macro that displays a message box then opens a form.
Message Boxes, Forms and Macros
Suggested results:
In the Macro list of the Database window, you would have clicked the New button to get started.
In the Macro Builder, you would have typed the word "OpenClients" in the top row of the Macro Name column then clicked in the next cell to the right to mimic pressing Tab.
You would have then clicked the drop-down arrow in the macro's Action list box.
You would have clicked the lower part of the scrollbar to get to the OpenForm action.
You would have clicked the lower part of the scrollbar again to scroll the rest of the way.
You would have then selected the OpenForm action.
You would have seen the Action Arguments for the OpenForm macro action listed in the bottom half of the builder, placed the cursor in the Form Name argument, and typed "Clients".
You would have then run the completed macro by clicking the Run toolbar button.
Once you clicked the Run command, you would have clicked Yes to save the macro.
Once in the Save As dialog, you would have typed the text "OpenClients", then clicked OK.
You would have then seen the Clients form opened by the macro.
In the next lesson, you will learn how to assign a macro to a command button on a form by using the OnClick event of a command button.