Assigning Macros to Controls on Form - Exercise Result
You entered:Creating Macro and assigning it to an Event
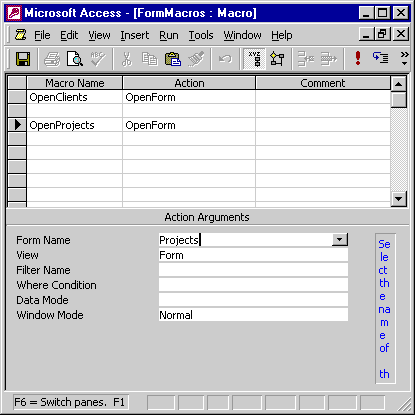
The macro group should look like this:
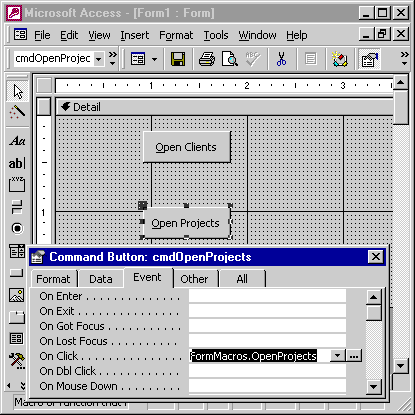
The command buttons will look something like this with the OnClick event:

Create a macro and assign it to an Event in Access 2019
Creating a macro and assigning it to an event in Microsoft Access 2019 involves a series of steps that utilize the Access interface to design automation routines. These routines are then triggered by specific events such as button clicks or record updates. Below is a structured guideline detailing how to create a macro and subsequently assign it to an event:
Creating a Macro in Microsoft Access 2019
Steps:Creating a macro and assigning it to an event in Microsoft Access 2019 involves a series of steps that utilize the Access interface to design automation routines. These routines are then triggered by specific events such as button clicks or record updates. Below is a structured guideline detailing how to create a macro and subsequently assign it to an event:
Creating a Macro in Microsoft Access 2019
Steps:- Open the Access Database: Open the database where you intend to create the macro.
- Navigate to Macro Design: Click on `Create` on the Ribbon toolbar, followed by `Macro` in the `Macros & Code` group. This opens the Macro Builder.
- Design the Macro: In the Macro Builder, you'll see a list of Action Commands. Add the actions you wish to execute, specifying any required arguments.
For example, to open a form, you would select `OpenForm` from the `Action` dropdown list, and then fill in the `Form Name`, `View`, and other arguments. - Conditional Logic: If necessary, apply `If` statements to insert conditional logic into the macro.
- Validate the Macro: Use the `Run` button to test the macro.
- Save the Macro: Once you are satisfied with its operation, save the macro by clicking `Save` and providing a name.
- Provides a code-free method for automating tasks.
- Allows quick implementation of commonly used actions.
Cons:
- Limited to predefined actions and lacks the granularity of control provided by VBA.
Assigning the Macro to an Event
Steps:- Identify the Event Source: Decide on which object (like a button or a form) will trigger this macro.
- Open Object in Design View: Right-click on the object (e.g., a button on a form) and select `Design View`.
- Access Event Properties: With the object selected, go to the `Property Sheet`. Switch to the `Event` tab if not already there.
- 4. Assign the Macro: Locate the event property that you wish to assign the macro to (e.g., `OnClick` for a button). Click on the dropdown menu and you will see a list of available macros.
- 5. Select Macro: Choose the macro that you created earlier.
- Save and Test: Save the object and switch back to `Form View`. Test the event to ensure the macro is triggered as expected.
- Enables interactive, user-defined behaviors within Access databases.
- Facilitates the automation of repetitive tasks and procedures.
- Limited to the scope and flexibility of pre-defined Access events.
Considerations:
- Debugging: Always test the macro thoroughly to avoid runtime errors or unintended actions.
- Security: Macros can execute powerful commands; ensure they can only be triggered by authorized users.
Creating a macro in Microsoft Access 2019 and assigning it to an event allows for automated, conditional logic-based tasks to be executed seamlessly, enhancing the functionality and user experience of the database system. Choose your macro actions and event triggers wisely to align with your application's requirements.