| Lesson 3 | Navigating a datasheet |
| Objective | How to move around within an Access datasheet. |
How to Move Around in an Access Datasheet
The legacy lesson correctly identifies core datasheet navigation features (new record row, record selectors, navigation buttons, and keyboard shortcuts). However, it relies on older UI terminology and includes an LLM-generated block that is broader than necessary for this lesson. This rewrite keeps the lesson focused on practical navigation inside Datasheet View, updates wording for Access (Microsoft 365 / Access 2021+), and preserves the existing images while making the learning sequence clearer: (1) locating the new record row, (2) using record navigation controls, and (3) using keyboard shortcuts for speed.
Ready to enter data
After you create a table (using a wizard/template approach or by building it manually), you can open it in Datasheet View to enter records. Before you start typing, it helps to understand how to move the cursor between fields and records.
To move to a new record, you can click directly into the row marked with an asterisk (*) at the bottom of the datasheet, or you can use the New (blank) record navigation controls.
The datasheet includes a New Record button near the bottom of the window, such as:

Depending on your Access version and layout, you may also see a New button on the Ribbon or Quick Access Toolbar:

Key features of an Access datasheet
The diagram below highlights common datasheet elements you will use to navigate between records, including the record navigation buttons and the new record indicator.
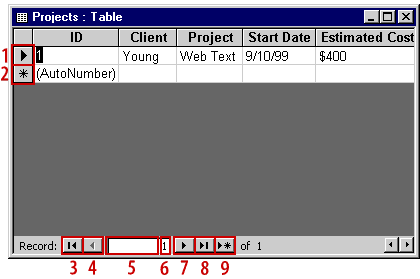
- Active record indicator: shows which record (row) currently has focus.
- New record indicator: marks the blank row where you can enter the next new record.
- First record: jumps to the first record in the table.
- Previous record: moves to the record above the current record.
- Record number box: enter a record number to jump directly to it.
- Current record number: indicates the record you are currently viewing/editing.
- Next record: moves to the record below the current record.
- Last record: jumps to the last record in the table.
- New (blank) record: moves the cursor to the new record row so you can begin entering data.
Keyboard shortcuts for fast navigation
You can move around a datasheet using either the mouse or the keyboard. Keyboard navigation becomes especially useful when you are entering many records quickly.
| Key | Where it puts the cursor |
|---|---|
| PgUp | Up one screen |
| PgDn | Down one screen |
| Ctrl-PgUp | Left one screen |
| Ctrl-PgDn | Right one screen |
| Tab | Next field (next column) |
| Shift-Tab | Previous field (previous column) |
| Home | First field of the active record |
| End | Last field of the active record |
| Up Arrow | Previous record (row above) |
Tip: You can also use the arrow keys to move between fields and records, and you can use the scroll bars to move quickly through large datasheets.
In the next lesson, you will learn how to enter and edit data in a datasheet efficiently and safely.