| Lesson 9 | Edit the table design by moving a field |
| Objective | Move a field in Datasheet and Design views |
Edit Table Design by moving Field
To move a field (column) in Datasheet View in Microsoft Access 365, follow these steps:
✅ Steps to Move a Field (Column) in Datasheet View:
💡 Tip:
✅ Steps to Move a Field (Column) in Datasheet View:
- Open your table in Datasheet View:
- In the Navigation Pane, double-click the table you want to work with.
- Click the column header of the field you want to move:
- The entire column will be selected (highlighted).
- Drag the selected column to the desired location:
- Hover over the column header until the cursor becomes a black down arrow.
- Click and hold, then drag the column left or right.
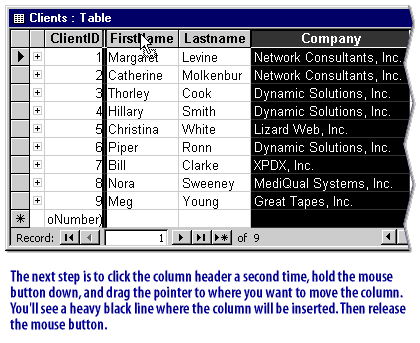
- As you drag, a vertical bar will appear to indicate the drop location.
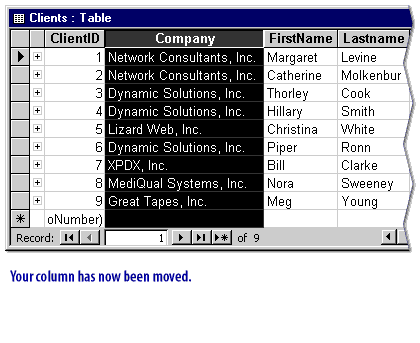
- Release the mouse button to drop the field in the new location.
💡 Tip:
- This change is visual only unless you save the table structure.
- To save the new field order, click File > Save, or press Ctrl + S.
To move a field in Design View
To move a field in Design View in Microsoft Access 365, you're actually changing the order in which fields appear in Datasheet View, forms, and reports by default.
✅ Steps to Move a Field in Design View:
📝 Notes:
After you create a table you may decide that the fields would work better in a different order. Fortunately, moving a field to a different position in a table is one of the easiest tasks there is in Access. You move a field the same way in either the datasheet or the Design view. The following series of images shows you how:
✅ Steps to Move a Field in Design View:
- Open the table in Design View:
- Right-click the table in the Navigation Pane.
- Choose Design View.
- Select the row (field) you want to move:
- Click the row selector (gray box to the left of the field name) for the field you want to move.
- The entire row should be highlighted.
- Drag the selected row up or down:
- Move the cursor to the row selector until it becomes a black arrow.
- Click and drag the row to the new position in the list of fields.
- Release the mouse button when the row is in the desired position.
- Save the changes:
- Press Ctrl + S or click the Save icon on the Quick Access Toolbar.
📝 Notes:
- The field order here determines the default order when viewing the table in Datasheet View.
- It does not affect forms or reports unless they are re-bound or refreshed.
After you create a table you may decide that the fields would work better in a different order. Fortunately, moving a field to a different position in a table is one of the easiest tasks there is in Access. You move a field the same way in either the datasheet or the Design view. The following series of images shows you how:

| ClientID | FirstName | Lastname  | Company                   |
| -------- | --------- | --------- | ------------------------- |
| 1        | Margaret  | Levine    | Network Consultants, Inc. |
| 2        | Catherine | Molkenbur | Network Consultants, Inc. |
| 3        | Thorley   | Cook      | Dynamic Solutions, Inc.   |
| 4        | Hillary   | Smith     | Dynamic Solutions, Inc.   |
| 5        | Christina | White     | Lizard Web, Inc.          |
| 6        | Piper     | Ronn      | Dynamic Solutions, Inc.   |
| 7        | Bill      | Clarke    | XPDX, Inc.                |
| 8        | Nora      | Sweeney   | MediQual Systems, Inc.    |
| 9        | Meg       | Young     | Great Tapes, Inc.         |
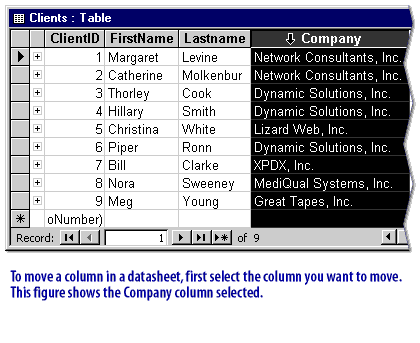
To move a column in a datasheet, first select the column you want to move.


How to move a field in MS Access Datasheet View
To move a field in MS Access Datasheet View, start by opening the table you want to modify in Datasheet View. This view displays the table’s data in a spreadsheet-like format, with fields as columns and records as rows. Locate the column header of the field you wish to reposition. Click and hold the column header, which will highlight the entire column. While holding the mouse button, drag the column to the desired position in the table. A vertical insertion line will appear as you drag, indicating where the field will be placed when you release the mouse button. Release the mouse when the insertion line is at the correct spot. This action reorders the field’s display in Datasheet View without altering the underlying table structure.
It’s important to note that moving a field in Datasheet View only changes the visual arrangement of the columns for that specific table view and does not affect the field order in the table’s design or other views, such as Design View. If you want to make a permanent change to the field order in the table’s structure, you need to modify the table in Design View instead. Additionally, ensure you have the necessary permissions to edit the table, as some databases may restrict changes in Datasheet View. After moving the field, verify that the new arrangement meets your needs by checking how the data displays and ensuring that any related queries, forms, or reports still function correctly.
If you encounter issues while moving a field, such as the column not dragging or the insertion line not appearing, check that the table is not locked or set to read-only. You can also adjust the table’s properties by right-clicking the column header and selecting options like “Freeze Fields” or “Hide Fields” to manage the view further. To confirm the field has moved correctly, save the table layout by closing the table and reopening it in Datasheet View. If you need to revert to the original layout, you may need to reset the column order manually or use the “Remove Sort” or “Reset” options if available. Always back up your database before making structural or layout changes to avoid accidental data loss.
Learn to choose and define a primary key field.