| Lesson 2 | Creating a new table with a wizard |
| Objective | Use the Table Wizard to create a table. |
Create an Access Table Using the Table Wizard
The legacy lesson explains the basic intent of the Table Wizard, but it uses older UI wording (for example, “Database Window” and “Objects bar”) and frames the wizard as the primary approach for table creation. In modern Access (Microsoft 365 / Access 2021+), a guided creation experience still exists through templates and table-building helpers, but best practice is to treat wizard-generated tables as a starting point and then refine the table in Design View (field names, datatypes, primary key, and field properties). This rewrite modernizes the wording, retains the step-by-step learning flow, and adds practical guidance to keep the resulting table aligned with good database design.
Many Access databases share common table patterns (employees, contacts, tasks, inventory, and so on). To speed up table creation, Access provides guided options that work like a wizard: you select a sample table, choose the fields you want, and let Access create the table with initial datatypes and a primary key.
The Table Wizard is most useful when you want a quick starting point. After the table is created, you should review it in Design View and adjust it to match your actual requirements (field names, datatypes, Required settings, and validation).
Ready to create a table quickly? The following guided steps lead you through a wizard-style creation process.
Create New Table with Wizard
-
Open your database, then go to the Create tab on the Ribbon.
Choose the option that launches the guided table creation experience (wizard/template table creation).
Note: The exact label can vary by Access version, but the goal is the same—start from a sample table and customize fields. -
Select a category such as Business or Personal, then choose a sample table
from the list (for example, Employees).
If the sample table list is long, use the scroll bar to see more options. -
After you select a sample table, review the sample fields. Add fields to your new table by either:
- Double-clicking a field name (fastest for selecting individual fields), or
- Using the arrow buttons to move one or all fields into the “Fields in my new table” list.
-
Review the list of fields in your new table. If a field is not needed (for example, Department in a simplified
practice table), select it and remove it.
Best practice: include only the fields you need. Extra fields encourage inconsistent data entry and complicate later changes. -
If the wizard allows it, rename fields now to match your naming standards. Use clear, descriptive names and avoid abbreviations
that a new user would not understand.
Example: useEmployeeIDrather thanEmp#. -
Choose a table name. Use a name that describes the entity stored in the table (for example,
Employees).
Best practice: be consistent across your database (plural table names or singular table names—pick one convention and stick with it). -
Decide on the primary key. For an Employees table, the wizard will often recommend an ID field (for example, EmployeeID).
Best practice: ensure the primary key uniquely identifies each record and does not change over time. -
Choose how to open the result:
- Datasheet View to begin entering sample data immediately, or
- Design View to review datatypes and properties before data entry.
-
Save the table and review the field definitions. If the wizard created text fields that should be typed (Date/Time, Number,
Currency), correct them now.
Best practice: correct datatypes early—changing datatypes later can break queries and forms. - When you are satisfied with the design, switch to Datasheet View and enter a few records to confirm the table behaves the way you expect (sorting, filtering, and basic validation).
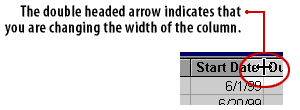
Resizing a Column
When you open a newly created table in Datasheet View, some column headers or values may be cut off. You can adjust column width so the field names and data are easier to read.
The fastest method is to double-click the right edge of the column header boundary to automatically size the column to its contents. You can also click and drag the boundary left or right for manual control.
Tip: In modern Access, you can also select a column and use Ribbon options (Layout tab) to AutoFit the column or set an exact width.
Creating New Table with Wizard - Exercise
Click the Exercise link below to practice creating a table using the wizard-style table creation steps described above.
New Table with Wizard - ExerciseIn the next lesson, you will be introduced to the datasheet and how to enter and edit records.