| Lesson 7 | SQL Server Data Tools |
| Objective | SQL Server Data Tools (SSDT) for Visual Studio in SQL Server 2025 |
SQL Server Data Tools (SSDT) in SQL Server 2025
The previous lesson covered what SQL Server Integration Services (SSIS) is and what it's good for. This lesson walks through actually building a package with SQL Server Data Tools (SSDT), the graphical designer that runs inside Visual Studio.
PrerequisitesBefore you begin, make sure the following are installed:
- SQL Server 2025
- SQL Server Management Studio (SSMS)
- A current version of Visual Studio
- The SQL Server Integration Services Projects extension, which adds the Integration Services Project template SSDT needs
Install the extension through the Visual Studio Installer, or from inside Visual Studio under:
Extensions > Manage Extensions
The extension is versioned to match the Visual Studio release it targets (it's typically listed under an
identifier along the lines of Microsoft.DataTools.IntegrationServices), so it's worth confirming
the extension's own version lines up with whichever Visual Studio version is actually installed before assuming
a package that opens cleanly on one machine will open the same way on another.
- Search for Integration Services Project.
- Select Integration Services Project from the list.
- Click Next.
- Enter a project name, for instance
ETL_SalesData_Importfor a package that keeps this course's ownSalesOrdersdata current. - Choose a location to save the project.
- Click Create.
This generates a default package file named Package.dtsx.
You'll now be inside the SSIS Designer window, with several tabs available:
-
Control Flow
- Drag and drop tasks onto the canvas, for example:
Data Flow TaskExecute SQL TaskFile System Task
- Connect them with precedence constraints to define the high-level workflow: load data, clean it, move it, in whatever order the job actually needs.
- Containers, a Sequence Container to group related tasks, a For Loop or Foreach Loop Container to repeat a set of tasks, give the control flow its own branching and repetition logic without writing a separate script to manage it.
- Drag and drop tasks onto the canvas, for example:
-
Data Flow (within a Data Flow Task)
- Double-click the
Data Flow Taskto open the Data Flow tab. - Add components:
- Source: OLE DB Source, Flat File Source, Excel Source
- Transformations: Derived Column, Lookup, Sort, Conditional Split
- Destination: OLE DB Destination, Flat File Destination, and so on
- Double-click the
-
Parameters and Variables
- Use Package Parameters for external configuration, an environment-specific connection string, for example, set from outside the package rather than hard-coded into it.
- Use Variables for internal dynamic control, a loop counter or a flag one task sets and another reads, the same way a local variable works inside a T-SQL batch.
-
Event Handlers
- Respond to events a task or the package itself raises,
OnErrororOnTaskFailed, for example, with their own small workflow: log the failure, send a notification, clean up a partially loaded staging table, rather than letting the whole package simply stop. - An event handler is built the same way any other part of the package is, by dragging tasks onto its own canvas, so a response to a failed Data Flow Task can itself be a short control flow: an Execute SQL Task that writes the error description and the failed task's name to a logging table, followed by a Send Mail Task, rather than a single hard-coded action.
- Respond to events a task or the package itself raises,
Before a source or destination component can do anything, it needs a connection manager: a reusable, saved
connection a package's components point to rather than each one storing its own copy of a connection string.
An OLE DB connection manager might point at the server hosting SalesOrders and
Inventory, for example, and both the OLE DB Source feeding the data flow and the OLE DB Destination
writing the result can share that same connection manager rather than each repeating the server name,
authentication method, and database separately. The Entra ID authentication options and the ADO.NET connection
manager's TLS 1.3 and strict-encryption support, both covered in the previous lesson, apply here too, since a
connection manager inside a package is still, underneath, the same kind of connection this course has already
covered for any other client talking to SQL Server.
Putting the pieces together, consider rebuilding this course's own archive example, originally written as a
single SELECT INTO statement earlier in this module, as an SSIS package instead:
- An Execute SQL Task on the control flow runs a quick check, confirming
SalesOrdersArchiveexists and is ready to receive rows, before anything else runs. - A Data Flow Task, connected to that Execute SQL Task with a precedence constraint so it only
runs on success, contains the actual movement of data: an OLE DB Source pulls rows from
SalesOrderswhereOrderDateis before the cutoff, a Derived Column transformation adds anArchivedDatecolumn stamped with the current date, and an OLE DB Destination writes the result intoSalesOrdersArchive. - A second Execute SQL Task, this one wired to the Data Flow Task's failure path rather than
its success path, logs an entry to an errors table if the load doesn't complete, the same kind of pattern this
course already covered as a
TRY/CATCHblock in a plain T-SQL script.
None of these individual pieces does anything a single SELECT INTO statement couldn't do on its
own for a one-off run. What the package adds is the explicit, visible branching: a verification step before the
load, a logged failure path instead of a silent one, and a shape that's easy for someone other than whoever
built it to open and follow a year later.
Building a package has real overhead: a project to create, connection managers to configure, a deployment to manage. For a load that only ever runs once, or that's simple enough to fit in a few lines of T-SQL, that overhead usually isn't worth paying. A package tends to earn its keep when at least one of the following is true: the load genuinely needs branching or conditional logic beyond a single statement, it pulls from more than one kind of source (a flat file and a database table together, for instance, as in this module's very first SSIS example), it needs to keep running on a schedule without someone manually kicking it off, or someone who isn't comfortable writing T-SQL still needs to be able to see what a job does and, within reason, adjust its parameters without touching its logic. The DP-300 (Azure Database Administrator Associate) skills outline, referenced earlier in this module under planning a migration strategy, treats this kind of judgment call, which tool fits a given job, as part of the role itself rather than a detail left to personal preference; knowing when not to reach for SSIS is as much a part of that skill as knowing how to use it.
Step 3: Test and Debug the Package- Right-click on the Control Flow canvas and choose Execute Package.
- View output in the Progress tab: what ran, what succeeded, and what, if anything, failed.
- Use Breakpoints and Data Viewers in the Data Flow to pause execution and inspect the actual rows passing through a path, usually the fastest way to find where a transformation is doing something other than what was intended. A Data Viewer can show the rows as a plain grid, which covers most debugging needs, or as a histogram or scatter plot when the question is more about the shape of the data than any individual row.
Most package failures trace back to one of a small handful of causes: a connection manager pointing at the wrong server or database, often because a project parameter wasn't overridden for the environment it's actually running in, a data type mismatch between what a source column provides and what a destination column expects, or a transformation's assumptions not holding for a row the original design didn't anticipate, a null value reaching a Derived Column expression that assumed one would never show up, for instance. Checking the connection managers first, before digging into the data flow itself, resolves a surprising share of failures that otherwise look like a transformation bug.
Step 4: Deploy the Package
Two deployment paths exist, and they aren't equally current:
-
A. Project Deployment Model
- Right-click the project in Solution Explorer.
- Choose Deploy.
- Use the Integration Services Deployment Wizard to deploy to the SSISDB Catalog on SQL Server 2025.
- Define a folder name, an environment, and any parameters as part of the deployment.
This is the model this course already covered when it introduced the SSIS Catalog in the previous lesson, and it's the one worth defaulting to for anything beyond a one-off script: every execution it runs is logged and queryable through the catalog's own views, and the project itself is versioned, so a bad deployment can be traced back to exactly what changed.
-
B. Legacy File-Based Deployment
- Copy the
.dtsxpackage file to a location. - Use SSMS's Integration Services node, or the
dtexeccommand-line utility already covered in the previous lesson, to run the package.
This still works, but it's the older package deployment model this course already flagged as the one behind the now-deprecated legacy Integration Services Service in SQL Server 2025. It's worth knowing it exists, particularly for an older package that was never migrated, rather than reaching for it by default on anything new.
- Copy the
Optional: Schedule the Package with SQL Server Agent
-
In SQL Server Management Studio (SSMS):
- Go to SQL Server Agent > Jobs.
- Create a new job and add a SQL Server Integration Services Package step.
- Point it to the package deployed in SSISDB.
Summary
| Step | Description |
|---|---|
| 1 | Create an Integration Services Project in SSDT |
| 2 | Use Control Flow and Data Flow to design the ETL logic |
| 3 | Test and debug the package |
| 4 | Deploy using the Deployment Wizard, or manually with a legacy file-based approach |
| 5 | (Optional) Schedule execution using SQL Server Agent |
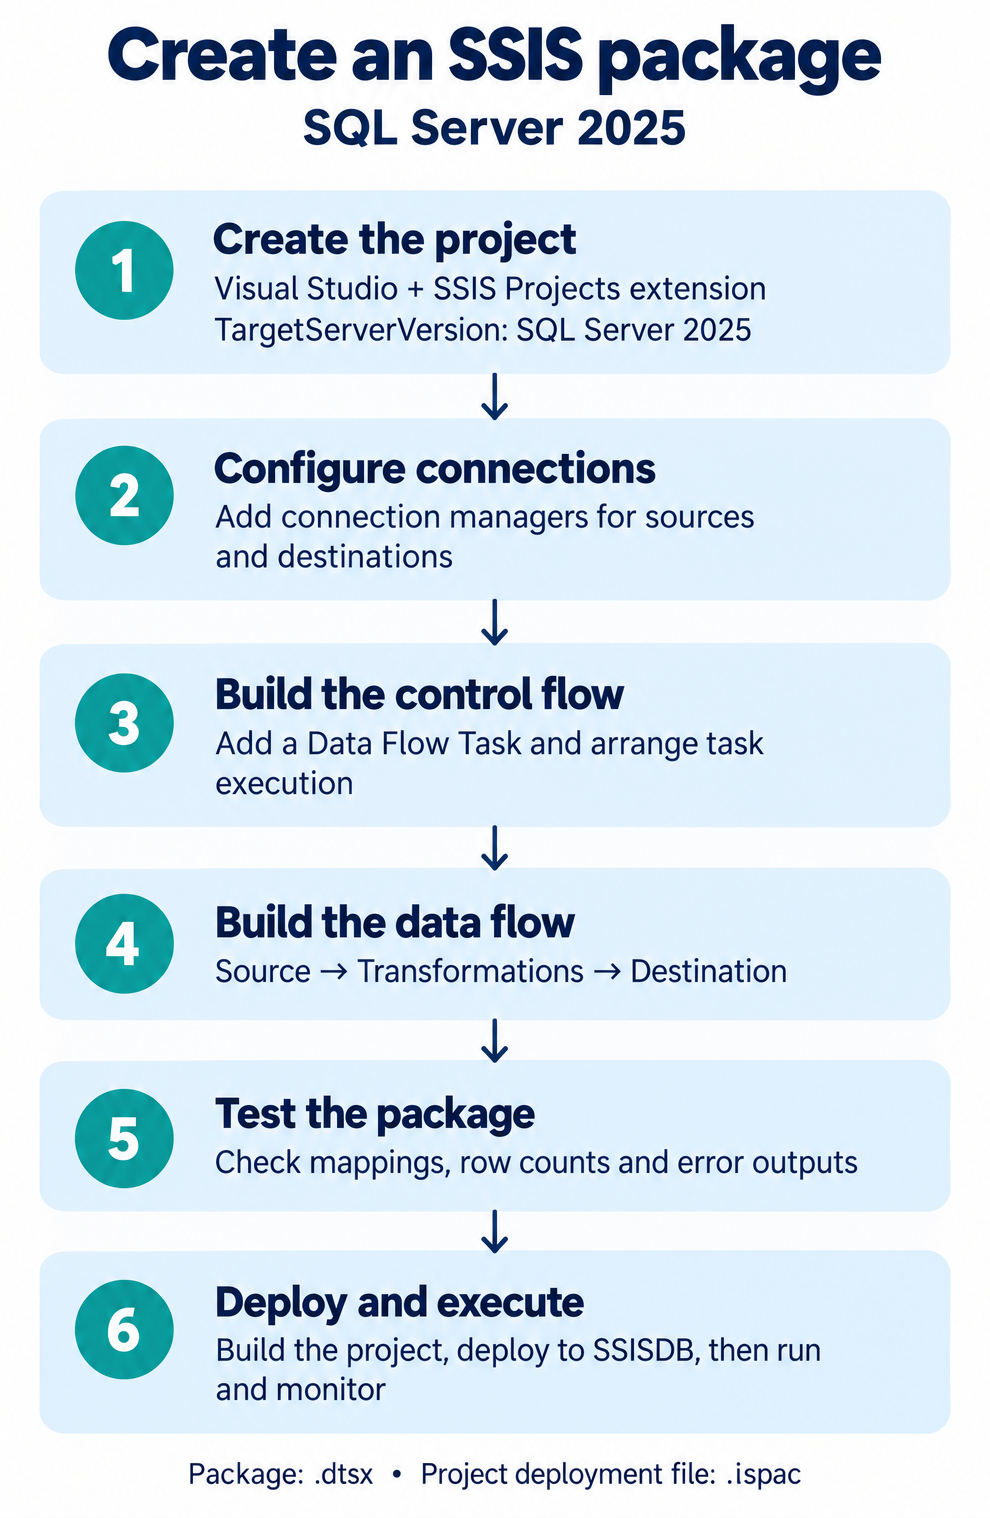
.dtsx
package and an .ispac project deployment file.What SSDT Actually Replaced
SSDT is sometimes described as a modern replacement for the old DTS Package Manager, but that's not quite the right lineage. SSIS itself, as this module has already established, replaced Data Transformation Services (DTS) back in SQL Server 2005. SSDT's own history is a separate, later story: it replaced Business Intelligence Development Studio (BIDS), the earlier Visual Studio-based tool SSIS packages were designed in, when SSDT took over that role starting with SQL Server 2012. The naming has moved twice: DTS to SSIS for the platform itself, then BIDS to SSDT for the tool used to design it. It's worth keeping the two renames straight rather than collapsing them into one, especially since older material, like the stray comment this page's own source still carried about "DTS Package Designer Buttons," tends to blur exactly that distinction.
SSDT is, at the same time, both a tool and a description of what it produces: the tool is Visual Studio plus the Integration Services Project extension, and the package it produces is itself a workflow, orchestrating a set of data integration steps the same way a T-SQL script orchestrates a set of statements, just expressed visually instead of as code.
The .dtsx File Format
In SQL Server, the .dtsx extension designates a file that is an SSIS package: a unit of work
defining a sequence of tasks executed to perform data-related operations. These can include:
- Extracting data from various sources, databases, flat files, XML files, and more.
- Transforming data: cleansing, aggregating, joining.
- Loading data into destinations: databases, data warehouses, flat files.
- Performing workflow and control flow tasks: looping, branching, sending notifications.
A .dtsx file is stored in XML format. It holds every definition and configuration the package needs:
connections to data sources and destinations, tasks and control flow logic, data flow components and
transformations, and variables, parameters, and event handler configurations. Because it's plain XML, a
.dtsx file can be opened in a text editor and read, if not comfortably edited, entirely outside of
SSDT.
A deployed .dtsx package is a deployable, executable unit, runnable through several methods already
covered in this lesson and the one before it: SQL Server Management Studio, the dtexec command-line
utility, a SQL Server Agent job, or from inside Visual Studio during development itself. In essence, the
.dtsx file is the blueprint that tells SQL Server Integration Services how to move, transform, and
manage data; everything else, the catalog, the deployment wizard, the scheduling, exists to run that blueprint
reliably and repeatedly rather than by hand, once.
Because a package's XML is plain text, the same practice this course already recommended for bcp's
format files applies here too: storing .dtsx and .ispac files in source control
alongside whatever else makes up a project, rather than only in whatever folder the Deployment Wizard happened
to write to last. A package that changed behavior with no corresponding record of why is a much harder problem
to diagnose than one line in a commit history explaining the change.