Input Masks - Exercise Result
You entered:Course project: Using the Input Mask Wizard
For one of your large clients, you needed to set its database to have an input mask to receive Social Security information.
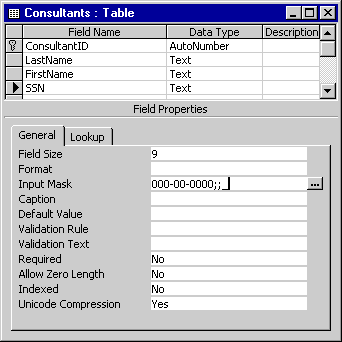
When set correctly, your table should look like the figure displayed here:

- Table Name: Consultants : Table
- Field Properties (General Tab):
- Field Size: 9
- Format: (empty)
- Input Mask: 000-00-0000;_;
- Caption: (empty)
- Default Value: (empty)
- Validation Rule: (empty)
- Validation Text: (empty)
- Required: No
- Allow Zero Length: No
- Indexed: No
- Unicode Compression: Yes
Table Fields
- ConsultantID - Data Type: AutoNumber
- LastName - Data Type: Text
- FirstName - Data Type: Text
- SSN - Data Type: Text
Consultants: Table consisting of 1) Field Name 2) Data Type 3) Description
Use the Input Mask Wizard in MS Access to validate Fields
The Input Mask Wizard in Microsoft Access is a powerful tool used to control the format of the data being entered into a field. It can be particularly helpful in maintaining the consistency of data, ensuring that phone numbers, dates, and other types of data are entered in a specific way. It also aids in data validation, improving the accuracy and reliability of the data in your database.
Follow these steps to use the Input Mask Wizard in Microsoft Access:
Remember to save the changes to your table or form after you're done setting up the input mask. Now, every time a user enters data into that field, it must be in the format specified by your input mask, ensuring consistency and validity in your data.
Follow these steps to use the Input Mask Wizard in Microsoft Access:
- Open Your Table or Form: Start by opening the table or form where you want to apply an input mask. If you're working in a table, switch to design view by selecting "View" > "Design View." If you're working in a form, switch to layout view by selecting "View" > "Layout View.
- Select Your Field: Click on the field you want to validate to select it.
- Open the Input Mask Wizard: With your field selected, look for the 'Input Mask' property in the Field Properties pane at the bottom of the screen. Click on the three-dot button [...], this will open the Input Mask Wizard.
- Select an Input Mask: The Input Mask Wizard provides a list of pre-set input masks for common data types. You can select the one that matches the type of data you want to validate, such as phone number, postal code, date, etc. For example, you might select the Short Date option for a date field. After selecting the mask, click 'Next'.
- Review and Modify the Mask: After you've selected a mask, the Wizard will display it in the 'Try It' box. Here, you can test the mask and see how it works. If you want to adjust the mask, you can modify it in the 'Edit Mask' box. For example, you can add placeholders, literal characters, or change the mask characters as needed.
- Select Placeholder Character: If you want a character to appear in the data entry box before a user starts typing, select it here. This can be helpful to indicate the required format of the data. Click 'Next' after you've made your selection.
- Choose to Store the Data with the Mask: You can choose whether to store the data in your table with the mask characters (like parentheses, spaces, and dashes in a phone number), or just the actual data. If you want to store only the data, make sure to check the 'Without the symbols in the mask' option. Click 'Next'.
- Finish the Wizard: Review the input mask and click 'Finish' if everything is correct. The mask is now applied to your field.
Remember to save the changes to your table or form after you're done setting up the input mask. Now, every time a user enters data into that field, it must be in the format specified by your input mask, ensuring consistency and validity in your data.