| Lesson 7 | Specifying join properties for Queries in MS Access |
| Objective | Identify three different types of joins available and how they can be used. |
Specifying Join Properties for Access Queries
Most useful queries draw data from more than one table. The mechanism that connects those tables inside a query is called a join. A join tells Access which field in one table corresponds to a field in another table, and it controls exactly which records from each table appear in the result. Choosing the right join type is one of the most consequential decisions you make when building a multi-table query, because different join types can return very different sets of records from identical underlying data.
Access supports three join types:
Access supports three join types:
- Inner Join — the default
- Left Outer Join
- Right Outer Join
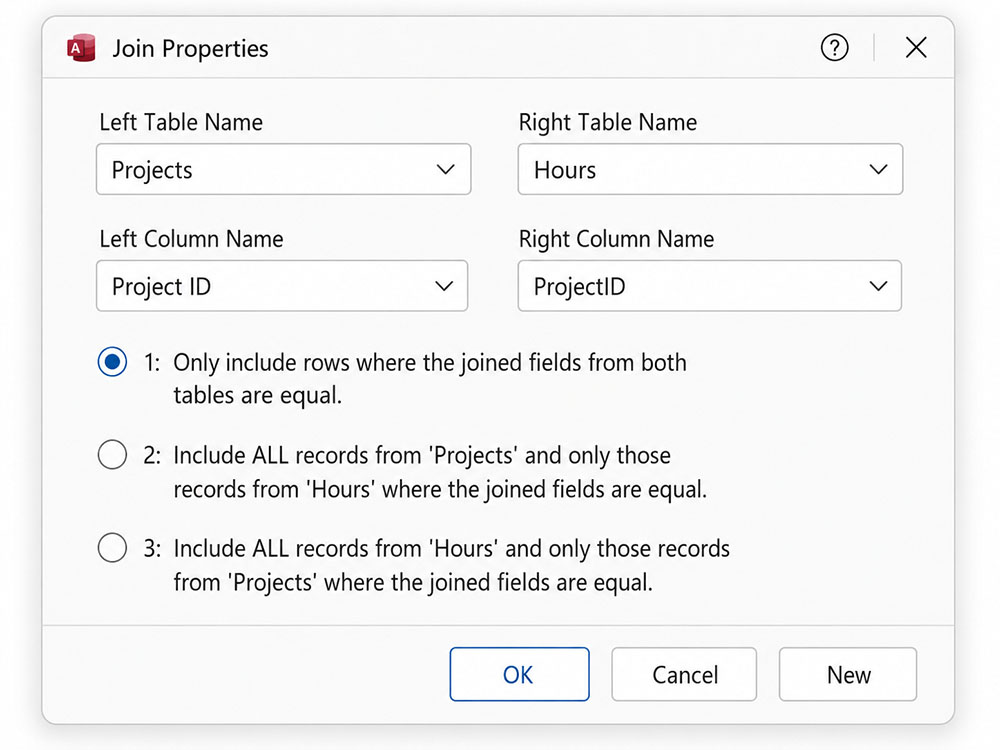
The dialog presents the join options in plain English, phrased in terms of the two specific tables involved in the join. In the examples throughout this lesson, the query joins the Projects table to the Hours table on the ProjectID field — Projects being the "one" side of the relationship, Hours being the "many" side. Let us look at what each option means in practice.
Inner Join
Only include rows where the joined fields from both tables are equal.
The inner join is the most restrictive of the three options. It returns a record only when there is a matching value in the join field on both sides of the relationship. If a record exists in one table with no corresponding record in the other, it is excluded from the result entirely.
Applied to the Projects and Hours tables: a project that has been entered into the Projects table but has no hours recorded in the Hours table will not appear in the query results at all. Conversely, an Hours record whose ProjectID does not match any ProjectID in the Projects table — an orphaned record — will also be excluded. Only projects that have at least one matching Hours record are returned, and only Hours records that have a legitimate project behind them are returned.
This behavior is exactly what you want for most reporting queries. If you are calculating billable amounts per project, you are only interested in projects that have hours against them. An inner join keeps the result set clean and focused. It is the right default for the majority of queries you will build.
The join line in Design View for an inner join has no arrowhead — it is a plain line connecting the two join fields. This is the visual indicator that the join is symmetrical: both sides must contribute a match.
Left Outer Join
"Include ALL records from 'Projects' and only those records from 'Hours' where the joined fields are equal."
The left outer join relaxes the requirement on one side of the relationship. It returns every record from the left table — in this case, Projects — regardless of whether a matching record exists in the right table. For records in Projects that have no corresponding rows in Hours, Access still returns the Projects fields, but fills the Hours fields with
The practical use case is straightforward: you want to see all projects, including those that have not had any hours entered yet. With an inner join, those projects would be invisible — excluded because they have no Hours match. With a left outer join, they appear in the results with blank (Null) values in the Hours columns, making it immediately obvious that no hours have been recorded for them.
This is valuable for completeness audits. A project manager reviewing a weekly status report wants to see every active project, not just the ones with activity. A left outer join delivers that view. It is also the foundation of a classic data-integrity check: filter the results to show only rows where the Hours fields are Null, and you have a list of every project with no hours — potentially a data-entry gap worth investigating.
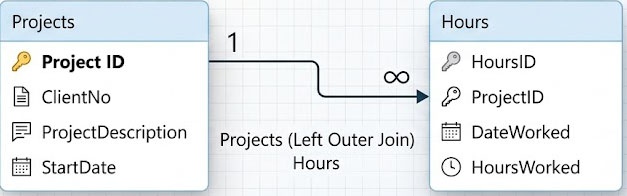
When you select the left outer join option in the Join Properties dialog, Access adds an arrowhead to the join line pointing toward the right table (Hours). The arrow indicates directionality: all records flow from the left (Projects), and only matching records come from the right (Hours).
The left outer join relaxes the requirement on one side of the relationship. It returns every record from the left table — in this case, Projects — regardless of whether a matching record exists in the right table. For records in Projects that have no corresponding rows in Hours, Access still returns the Projects fields, but fills the Hours fields with
Null values.
The practical use case is straightforward: you want to see all projects, including those that have not had any hours entered yet. With an inner join, those projects would be invisible — excluded because they have no Hours match. With a left outer join, they appear in the results with blank (Null) values in the Hours columns, making it immediately obvious that no hours have been recorded for them.
This is valuable for completeness audits. A project manager reviewing a weekly status report wants to see every active project, not just the ones with activity. A left outer join delivers that view. It is also the foundation of a classic data-integrity check: filter the results to show only rows where the Hours fields are Null, and you have a list of every project with no hours — potentially a data-entry gap worth investigating.
When you select the left outer join option in the Join Properties dialog, Access adds an arrowhead to the join line pointing toward the right table (Hours). The arrow indicates directionality: all records flow from the left (Projects), and only matching records come from the right (Hours).
Right Outer Join
"Include ALL records from 'Hours' and only those records from 'Projects' where the joined fields are equal."
The right outer join is the mirror image of the left outer join. It returns every record from the right table — Hours — regardless of whether a matching record exists in the left table (Projects). Hours records that have no corresponding project in the Projects table are still returned, with Null values filling the Projects fields.
Right outer joins are used less frequently than left outer joins in practice. The reason is purely mechanical: because you control which table sits on the left and which sits on the right in the query design grid, you can always rearrange the tables and use a left outer join to achieve the same result. The two join types are logically equivalent — only the table positions differ.
That said, the right outer join has a specific and useful role: data integrity checking. Applied to Projects and Hours, a right outer join returns all Hours records, including any whose ProjectID does not match a valid project. Filter the results to show only rows where the Projects fields are Null, and you have identified orphaned Hours records — time entries that reference a non-existent project. These records represent a referential integrity problem that should be corrected before it propagates into billing or reporting errors.
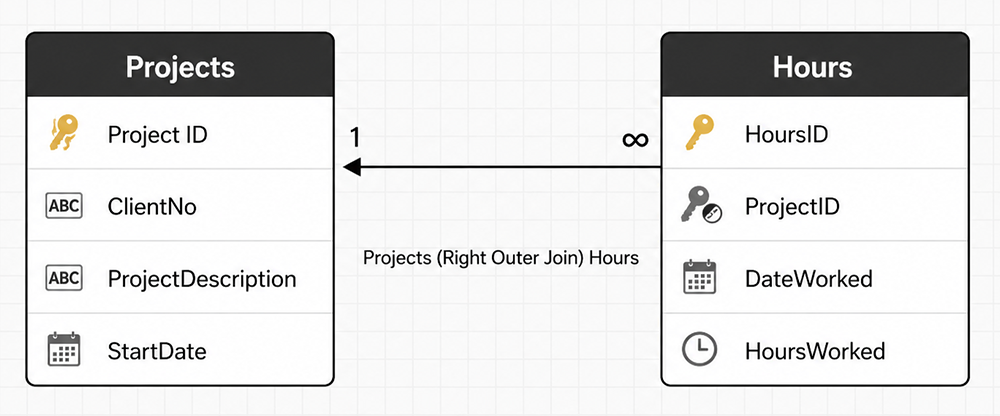
When you select the right outer join option, Access adds an arrowhead to the join line pointing toward the left table (Projects). The arrow direction is the visual key: it points opposite to a left outer join, toward Projects rather than toward Hours.
The right outer join is the mirror image of the left outer join. It returns every record from the right table — Hours — regardless of whether a matching record exists in the left table (Projects). Hours records that have no corresponding project in the Projects table are still returned, with Null values filling the Projects fields.
Right outer joins are used less frequently than left outer joins in practice. The reason is purely mechanical: because you control which table sits on the left and which sits on the right in the query design grid, you can always rearrange the tables and use a left outer join to achieve the same result. The two join types are logically equivalent — only the table positions differ.
That said, the right outer join has a specific and useful role: data integrity checking. Applied to Projects and Hours, a right outer join returns all Hours records, including any whose ProjectID does not match a valid project. Filter the results to show only rows where the Projects fields are Null, and you have identified orphaned Hours records — time entries that reference a non-existent project. These records represent a referential integrity problem that should be corrected before it propagates into billing or reporting errors.
When you select the right outer join option, Access adds an arrowhead to the join line pointing toward the left table (Projects). The arrow direction is the visual key: it points opposite to a left outer join, toward Projects rather than toward Hours.
Comparing the Three Join Types
The difference between the three join types becomes clearest when you think about what happens to unmatched records:
| Join Type | Unmatched Projects rows | Unmatched Hours rows | Primary use case |
|---|---|---|---|
| Inner Join | Excluded | Excluded | Standard reporting — matched data only |
| Left Outer Join | Included (Hours fields = Null) | Excluded | Show all projects, flag those with no hours |
| Right Outer Join | Excluded | Included (Projects fields = Null) | Find orphaned Hours records — data integrity check |
Changing a Join Type After Creation
You are not locked into the join type set when the query was first created. To change a join type at any time, open the query in Design View and double-click the join line between the two tables. The Join Properties dialog reopens, and you can select a different option. Click OK, and the join line updates — including the arrowhead — to reflect the new type. Switch to Datasheet view to see the effect on the result set immediately.
If you remove a join line accidentally — by clicking on it and pressing Delete — Access will produce a Cartesian product: every record in the left table paired with every record in the right table, which on any realistically sized dataset produces a very large and meaningless result set. If a query suddenly returns an unexpectedly large number of rows, check the Design View to confirm the join line is still present.
If you remove a join line accidentally — by clicking on it and pressing Delete — Access will produce a Cartesian product: every record in the left table paired with every record in the right table, which on any realistically sized dataset produces a very large and meaningless result set. If a query suddenly returns an unexpectedly large number of rows, check the Design View to confirm the join line is still present.
Join Types in SQL View
Each join type has a direct equivalent in SQL, which you can see by switching the query to SQL View while in Design View. Understanding the SQL syntax helps when you need to write or troubleshoot queries directly.
Notice that Access uses
-- Inner Join
SELECT Projects.ProjectDescription, Hours.DateWorked, Hours.HoursWorked
FROM Projects INNER JOIN Hours
ON Projects.ProjectID = Hours.ProjectID;

-- Left Outer Join
SELECT Projects.ProjectDescription, Hours.DateWorked, Hours.HoursWorked
FROM Projects LEFT JOIN Hours
ON Projects.ProjectID = Hours.ProjectID;

-- Right Outer Join
SELECT Projects.ProjectDescription, Hours.DateWorked, Hours.HoursWorked
FROM Projects RIGHT JOIN Hours
ON Projects.ProjectID = Hours.ProjectID;
Notice that Access uses
LEFT JOIN and RIGHT JOIN in SQL — the word "OUTER" is optional and Access omits it. The ON clause specifies the fields being joined, equivalent to the join line drawn between the field lists in Design View. Switching between SQL View and Design View as you modify a query is a good way to build familiarity with both representations.
In the next lesson, you will learn about the different types of queries available in Access and where each one can be used.
Specifying Join Properties For Queries - Exercise
Click the Exercise link below to practice using a left outer join to create a query.
Specifying Join Properties For Queries - Exercise
Specifying Join Properties For Queries - Exercise