| Lesson 6 | Adding a chart to a form |
| Objective | Use the Chart Wizard to add a chart to a form. |
Adding Chart to Access Form
Charts add a new dimension when you use them on your forms or reports.
Although they may seem kind of overwhelming at first, they are fairly straightforward when you use the Chart Wizard for a new form or the Chart option on the Insert menu for an existing form.

You can see an example of what a chart can look like in the figure display below:
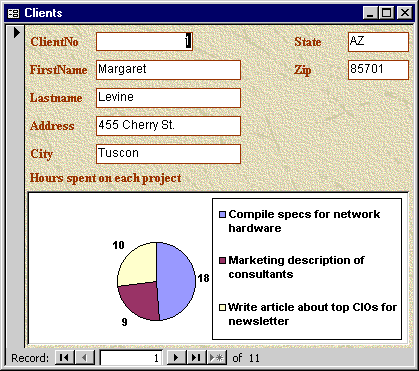
The chart displayed here is a simple pie chart, but there are 20 styles of charts to choose from. Once you have created a chart,
you can modify various properties such as the way data values are displayed using Microsoft Chart directly from Access.
One of the things to keep in mind when creating forms with charts is that you will want to base them on queries rather than on tables directly. The reason for using queries versus tables that you can then set up the fields in the query to be a much closer match to the data that you want to display in the chart. For example, the query that the chart in the figure below is based on is called qryHoursByProjects.
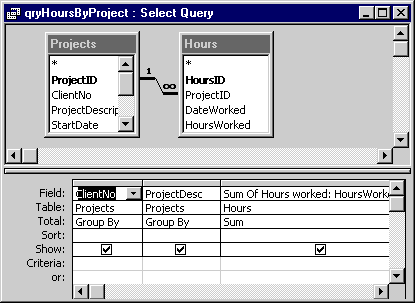
Notice that only the fields necessary for display in the chart itself are included.
To see the steps for creating a new chart on a form using the wizard, you will use a modified version of the qryHoursByProjects query called qryHoursByProjectsForClientNo. This query can be seen here:
To see the steps for creating a new chart on a form using the wizard, you will use a modified version of the qryHoursByProjects query called qryHoursByProjectsForClientNo. This query can be seen here:
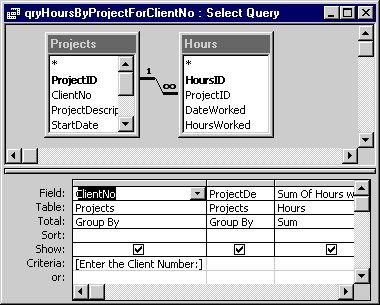
The only modification is the addition of the criteria requesting the client number (ClientNo). While in the Forms list of the Database window, choose New. The following section discusses the steps to use the Chart Wizard.
Using Access Chart Wizard
For further practice, try this on your own in Access, using another instance.
Let's review the correct steps to take:
In the next lesson, you will learn what ActiveX controls are and where you can use them.
Let's review the correct steps to take:
- In the New Form dialog, use the qryHoursByProjectForClientNo query. To do this click on the drop-down with the title "Choose the table or query where the object’s data comes from:"
- Now choose qryHoursByProjectForClientN.
- Now that the record source has been chosen, it is time to tell Access to use the Chart Wizard. Click the Chart Wizard in the list of wizards displayed.
- Click the OK button.
- Now you see the first page of the Chart Wizard. This screen lets you specify which fields to use for the chart’s x and y axes. Click the ProjectDescription listed in Available Fields column.
- Click the > button to move the ProjectDescription field over to the Fields For Chart column.
- By default, the wizard highlights the next field in the Available Field list. Click the > button to move the "Sum of Hours worked" field over to the Fields For Chart column.
- Click the "Next >" button.
- You can now see the various types of chart available to use. For our purposes, click the Pie chart in the bottom left-hand corner.
- Click the "Next >" button.
- This screen shows you how your data will look in the chart type you have chosen. You can change data around if you need to here, but this time, it is not necessary. Click the "Next >" button.
- This is the last screen. Although this screen allows you to change a number of items with the chart, we are going to go ahead and just change the title of the chart. To start, click the DEL key.
- Type in "Projects" for the new title. Then click the Finish key.
- Now, Access will open the form that was created with the Chart wizard. Since the query that the chart is based on uses a criteria setting, you are asked to enter a client number. Type "1" and click OK.
- When you rerun this and enter a different client number, all projects for that client are reflected.
In the next lesson, you will learn what ActiveX controls are and where you can use them.