Create a Subform control to display data from a related table.
Using Subform Control
Question: How do I create a Subform control to display data from a related table in MS Access?
Creating a subform control in Microsoft Access to display data from a related table involves several steps, all of which contribute to an effective data presentation strategy. By using subforms, you are able to easily visualize related data from different tables in one form. Here is a step-by-step guide on how to achieve this.
Step 1: Open the Main Form in Design View:
First, identify the form you want to host the subform control. Open the main form in Design View. You can do this by right-clicking the form in the Navigation Pane and selecting "Design View" from the context menu.
Step 2: Add the Subform Control to the Main Form:
In the Design View, navigate to the Design tab on the Ribbon. Select the "Subform/Subreport" button in the Controls group. Your cursor will change to a crosshair, allowing you to draw a rectangle on the main form where you want the subform control to be positioned. Click and drag to draw the rectangle.
Step 3: Bind the Subform Control to the Related Table:
The next step is to bind the subform control to the related table that you want to display. A wizard will appear once you've drawn the subform control. Follow these steps in the wizard:
Select "Use existing Tables and Queries" and click "Next". From the Tables/Queries dropdown, select the related table you want to display in the subform control. Select the fields you want to include in the subform control by clicking on the field in the Available Fields list and then clicking the ">" button. Repeat this step for all fields you want to include. Click "Next" when you're done. If Access detects a relationship between the main form's table and the subform control's table, it will suggest a link. Verify this link and click "Next". If Access doesn't suggest a link, you need to manually select the fields in both tables that create the relationship. The wizard will then ask you to choose a form layout. Choose the layout that suits your needs best and click "Next". Name the subform control. Access usually suggests a name based on the related table's name. You can use this name or choose your own. After naming the subform control, click "Finish".
Step 4: Save and View the Form:
Once you have completed these steps, Access will create a subform control that displays data from the related table. Save the main form and switch to Form View to see how it looks. The subform control will show related records based on the current record in the main form.
Note: You can adjust the design of the subform control by opening it in Design View. Right-click the subform control in the main form and choose "Subform in New Window". Then, switch to Design View to edit the subform control's design. Make sure to save any changes before closing.
Following these steps will ensure you have a functional subform control that displays data from a related table. It's an effective way to present and interact with related data in Microsoft Access.
Combo Box
Combo Box and List Box controls allow you to display information from another record source while on a form, as well as letting you update a lookup field in the form's record source. This is fine when you have only one field to update or want to view a little extra information. When you have to perform full editing capabilities with another related table while on a form, then the Subform control
located in the toolbox, is the control to use.
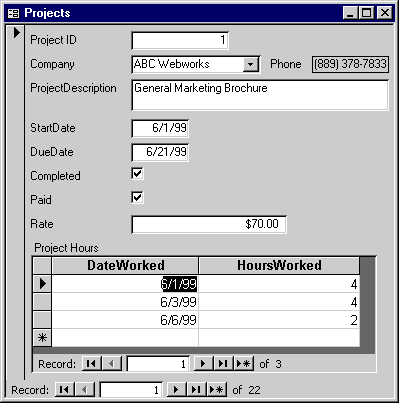
A good example of using a Subform control would be to include the hours for each of the projects stored in the project database,
Consulting307.mdb. You can see this example in the following figure:
Project Sub
Subform Control
As you move through each of the records in the Project table, the corresponding records in the Hours table will follow.
Because the Subform control uses a form in its Control Object property, you can set the form to be one of the three standard views: Datasheet, Continuous, and Single. All the other features that you can take advantage of in standard forms apply to subforms, such as scroll bars and editing properties. Some things do not apply, such as the Caption or Border Style properties.
On the Subform control itself, three main properties need to be set:
Source Object: This will be the form used as a subform.
Link Child Fields: This will be the field or fields, located on the subform, used to link the subform with the main form.
Link Master Fields: This will be the field or fields, located on the main form, used to link the main form to the subform.
When you use the Subform Wizard, the properties just discussed will be set for you when you answer the questions presented by the wizard. Note that you can also have a subform within a subform, up to three levels deep.
In the next lesson, you will learn how to create a simple multipage form by using Access’s Tab control.