| Lesson 9 | Customizing sections on a form |
| Objective | Modify the various form sections (headers, footers, and detail). |
Customizing Sections on Access Form
There are a total of five sections possible to use on a Microsoft Access form, of which one (the Detail section) is the only required one.
Explanation: In Microsoft Access, a form can have up to five sections, and the "Detail section" is the only one that is "required" to display data. The five sections are:
Key Point: The "Detail section: is the only mandatory section because it is where the data from the form's record source (table or query) is displayed. All other sections are optional and can be included or excluded based on the form's design needs.
Explanation: In Microsoft Access, a form can have up to five sections, and the "Detail section" is the only one that is "required" to display data. The five sections are:
- Form Header:
- Used for displaying a title, instructions, or any information that applies to the entire form.
- Optional.
- Page Header:
- Appears at the top of each printed page of the form.
- Optional.
- Detail:
- This section contains the actual data from the underlying table or query.
- Required. Without this section, the form cannot display or manage data.
- Page Footer:
- Appears at the bottom of each printed page.
- Optional.
-
Form Footer:
- Used for summaries, navigation buttons, or other controls that apply to the entire form.
- Optional.
Key Point: The "Detail section: is the only mandatory section because it is where the data from the form's record source (table or query) is displayed. All other sections are optional and can be included or excluded based on the form's design needs.
Access Section Display
1. Labels on the Microsoft Access Form The labels on the form are organized into the following sections:
Form Header
- Company Name
- Contact
- Phone
Page Header
- Customer Phone List
- Company Name
- Contact
- Phone
Detail Section This section does not contain labels but includes text boxes:
- CompanyName (bound to a field)
- ContactName (bound to a field)
- Phone (bound to a field)
Page Footer
- Contains a formula: `=Format(Date(), "Medium Date")` (likely displays the current date in medium format when the form is run).
Form Footer
- A set of alphabet navigation buttons labeled with letters A through Z, likely used for navigating to specific records based on alphabetic order.
Summary The form uses:
- Header and Footer labels for titles and data categorization.
- Alphabetic buttons in the footer for navigation.
- A page footer for dynamically displaying the current date.
| 1) | Form Header section: Used for displaying information or controls that remain the same for all records. |
| 2) | Page Header section: Used for column headings when printing a form. |
| 3) | Detail section: Displays record information. |
| 4) | Page Footer section: Used for summarizing page information when printing a form. |
| 5) | Form Footer section: Used for displaying information or controls that remain the same for all records. Also used for summarizing information for all records. |
Formulating Forms
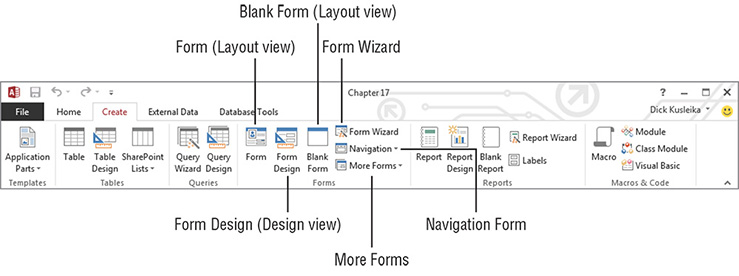
Use the Forms group on the Create tab of the Ribbon to add forms to your database. The commands in the Forms group, shown in Figure 4.9, let you create the following different types of forms and ways to work with Access forms:
Figure 4.9: Use the Forms group on the Create tab of the Ribbon to add new forms to your database.
Figure 4.9: Use the Forms group on the Create tab of the Ribbon to add new forms to your database.
-
🔴 Form (Layout View)
- Creates a basic form for the currently selected table or query.
- Opens in Layout View by default, which lets you adjust the design while previewing live data.
-
🔴 Blank Form (Layout View)
- Opens a completely empty form in Layout View.
- Useful when you want full control over form structure from scratch.
-
🔴 Form Wizard
- Launches a step-by-step wizard that helps you:
- Choose fields from one or more tables/queries
- Choose a layout style
- Name and save the form
- Great for beginners or quick multi-table forms.
-
🔴 Form Design (Design View)
- Opens a blank form in Design View.
- Full access to all design tools: headers, footers, control properties.
- Preferred for advanced form building and layout precision.
-
🔴 More Forms
- Dropdown menu that includes:
- Datasheet Form: Displays records in a spreadsheet-like grid.
- Split Form: Shows a form view and datasheet view at the same time.
- Multiple Items Form: Displays many records in a continuous layout.
- Other pre-defined templates for quick creation.
-
🔴 Navigation Form
- Allows you to build a navigation-style interface for your database.
- Often used as a main menu with tabs or buttons to open other forms, reports, or queries.
This Forms group offers a range of form creation options, from automated wizards to fully custom layouts, suitable for both novice users and advanced developers. Let me know if you want to match this layout to Access 365 with updated UI. Use the Forms group on the Create tab of the Ribbon to add new forms to your database.
You can see the Five Sections by clicking on the View Mouseover button to the left, or by using the Customer Phone List form from
Northwind.mdb, a sample database that comes with Access. By default, when you create a form from scratch, the Detail section is displayed. To display and use the other sections, you need to use either Page Header/Footer or Form Header/Footer from the View menu. Once you have displayed a section, you can then customize it as you like. Just as with the form as a whole and controls, you can modify different aspects of the form by double-clicking on a section, thereby displaying the property sheet. Here are a few tips to help you use the various sections to their best advantage:
- Use page headers and footers only when you are printing a form.
- Use form headers and footers for displaying controls and information that you want displayed regardless of what record you are on. Notice in the MouseOver that the buttons at the bottom of the form remain in place.
- When you want something to reflect for each record, put it in the Detail section.