| Lesson 5 | Navigating Report View |
| Objective | Use the buttons in Report view to navigate a report. |
Navigating Report View in Microsoft Access
Microsoft Access provides several tools for reviewing, navigating, and exporting reports.
Report View is one of the most commonly used modes for exploring a report because it displays live data, supports interactive filtering and searching, and offers flexible navigation tools.
This lesson introduces the most important navigation controls and explains how they appear in modern Microsoft 365 versions of Access.
Understanding Report View
Report View is designed for reviewing data—not for editing the structure of the report.
It behaves similarly to a lightweight print preview, giving users a clear view of the report’s content while still supporting interactive actions such as:
- Scrolling through large data sets
- Using navigation buttons to move between pages
- Zooming in and out to examine details
- Filtering and sorting fields directly from the report
- Searching for specific values using the built-in search box
Microsoft Access 365
Navigation Tools in Report View
Microsoft Access includes a set of intuitive controls for moving through multi-page reports:
- Navigation Buttons (Status Bar)
- First Page – jumps to the beginning of the report.
- Previous Page – moves one page backward.
- Page Number Box – enter a specific page number to jump directly.
- Next Page – moves one page forward.
- Last Page – jumps to the end of the report.
- Zoom Controls
- Zoom Slider – adjust magnification.
- Fit to Window – scales the report to fit your window dimensions.
- Preset Zoom Levels – choose options such as 100%, Fit Page, or Fit Width.
- Search Box (Top-Right)
- Type text to highlight matching values within the report.
- Useful for scanning long reports without manual scrolling.
- Filtering and Sorting
- Right-click on a field to filter or sort dynamically.
- Filters remain active until cleared or the report is closed.
- Scroll Bars
- Use vertical and horizontal scroll bars to move within the current page.
Keyboard Shortcuts
- Page Up / Page Down – Move one screen up or down.
- Ctrl + Home – Go to the first page.
- Ctrl + End – Jump to the last page.
- Arrow Keys – Pan across the current page.
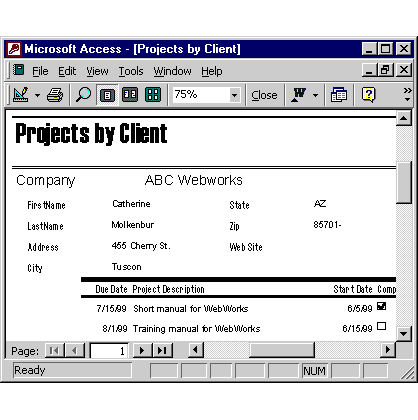
Example: Report Navigation Interface
The following example illustrates a typical Access report titled Projects by Client, showing the navigation elements described above.
Project List
Projects by Client

Company: ABC Webworks

First Name: Catherine
Last Name: Molkenbuhr

Address: 465 Cherry St.
City: Tucson
State: AZ
Zip: 85701-
Web Site: *(none shown)*
Project List
| Due Date | Project Description          | Start Date | Comp |
| -------- | ---------------------------- | ---------- | ---- |
| 7/15/99  | Short manual for WebWorks    | 6/5/99     |      |
| 8/1/99 | Training manual for WebWorks | 6/15/99 | || Location 1 | View: Design – Opens the report in Design View |
| Location 2 | Print – Opens the print dialog |
| Location 3 | Zoom – Toggles between zoom levels |
| Location 4 | One Page – Displays a single page |
| Location 5 | Two Pages – Displays two pages side by side |
| Location 6 | Multiple Pages – Lets you choose how many pages to show |
| Location 7 | Zoom – Allows manual zoom entry |
| Location 8 | Close – Returns to the previous window |
| Location 9 | Office Links – Export to Word or Excel |
| Location 10 | Database Window |
| Location 11 | First Page (disabled when already on first page) |
| Location 12 | Previous Page (disabled when none exists) |
| Location 13 | Go to Page – Enter a page number |
| Location 14 | Next Page – Moves forward one page |
| Location 15 | Last Page – Jumps to the final page |
| Location 16 | Scroll Bars – Pan within the current page |
Using the Mouse to Navigate
The Four Views of an Access Report
Microsoft Access provides four distinct views to support different stages of report development:
- Layout View – Shows real data and allows visual formatting and arrangement.
- Report View – Displays live data without allowing layout changes.
- Print Preview – Provides a paginated view optimized for printing and exporting.
- Design View – Offers full control over the report’s structure and layout elements.
To select a series of rows, click in the left margin beside the first row, then drag to highlight additional rows.
Right-click and choose Copy to transfer the selection to the clipboard for use in other Windows applications.
Navigating Report View – Exercise
Practice creating a report with the Report Wizard and preview it in Report View using the navigation tools introduced in this lesson.
Navigating Report View – Exercise
Navigating Report View – Exercise